14
Installation Instructions G5 - Revision C, September 2019
3M™ Drive-Thru System Model G5
Assembling the Control Pod and Carrier
Follow the procedure below to assemble the Control Pod and Carrier to form a fully functional headset:
1. On the opposite side of the Headset Carrier, ensure that the Control Pod Locking Mechanism is in the unlocked position by
sliding it all the way to the left. A small flat-head screwdriver or other similar tool can be used to slide the locking mechanism
if needed. See Figure 9 below.
2. Align Charging Contact Block on Control Pod into the Charging Contact Block Receptacle of the Headset Carrier. Once the
Charging Contact Block is set into in the Receptacle, it will act as a hinge or pivot point. See Figure 10.
3. Gently press the two halves together until they securely snap into place at the top. You may need to apply a slight downward
pressure to align the connections appropriately. When the Control pod is connected to the Carrier, you will hear a slight click.
See Figure 10.
4. Slide locking mechanism on the opposite side of the Carrier to the locked position. See Figure 9.
5. Insert battery into the now assembled headset. See Figure 11.
6. LED indicator lights on the Headset should start blinking (refer to Component Identification and Description
section below). The headset is now ready for registration to a Basestation.
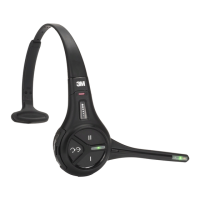
Figure 9.
Figure 10.
 Loading...