9
3.0 INSTALLATION
;
Installation of the Protecta Tripod must be supervised by a Qualied Person
1
. The installation must be certied by
a Competent Person
2
as meeting the criteria for a Certied Anchorage, or that it is capable of supporting the potential
forces that could be encountered during a fall.
1
2
3.1 PLANNING: Plan your fall protection system prior to installation of the Tripod. Account for all factors that may affect your
safety before, during and after a fall. Consider all requirements, limitations and specications dened in Section 2 and
Table 1. Any and all work must be carried out in such a way that the Tripod is positioned to minimize both the potential for
falls and the potential fall distance.
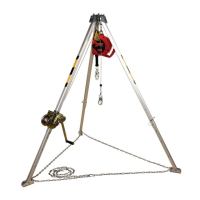
3.2 INSTALLING THE TRIPOD: To install the Tripod, see Figure 7:
1. Stand collapsed Tripod on the oor with each foot down. The chain should be connected loosely around the tripod.
2. Spread each leg of the Tripod to its locked position, with each foot resting level on the ground. Each leg should
be spread until it is heard to lock into place. To keep the legs locked, engage the locking pins on top of the head
assembly. The pins are open when they are pulled upwards and engaged when they are pressed down. Each of the
pins must be engaged for the Tripod to be used.
3. After locking the legs, remove the leg adjustment pins to shorten or extend the legs, if necessary. Once the desired
height for the Tripod is established, reinsert each leg adjustment pin through the bottom hole of each sliding bar of
the leg assembly.
4. Ensure that the Tripod is level, with the eye anchor bolt within 1° plus or minus from vertical. Make adjustments
of each leg as necessary, following the procedure of Step 3. Each leg should be maintain equal distance from the
proposed working area.
5. After setting up the Tripod and ensuring that it is level, verify that the chain is secure. Each of the legs should already
be extended so that the chain is secured tightly around the legs. Adjust if necessary. The chain should be threaded
through each of the eye bolts present on the three tripod feet. The chain ends should be secured with the chain hook.
6. After setting up the Tripod and ensuring that it is level and secure, install accessories necessary for the work area as
determined by a Qualied Person. Installation of accessories such as a self-retracting device (SRD) or winch should
refer to the instructions included with those products.
4.0 USE
4.1 BEFORE EACH USE: Verify that your work area and Personal Fall Arrest System (PFAS) meet all criteria dened
in Section 2 and a formal Rescue Plan is in place. Inspect the Tripod per the ‘User’ inspection points dened on the
“Inspection and Maintenance Log” (Table 2). If inspection reveals an unsafe or defective condition, do not use the system.
Remove the system from service and destroy, or contact 3M regarding replacement or repair.
4.2 FALL ARREST CONNECTIONS: The Tripod is used with a Full Body Harness and Energy Absorbing Lanyard or Self-
Retracting Device (SRD).
5.0 INSPECTION
;
After product has been removed from service, it may not be returned to service until a Competent Person conrms
in writing that it is acceptable to do so.
5.1 INSPECTION FREQUENCY: The Tripod must be inspected at the intervals dened in Section 1. Inspection procedures
are described in the “Inspection and Maintenance Log” (Table 2). Inspect all other components of the Fall Protection
System per the frequencies and procedures dened in the manufacturer’s instructions.
5.2 DEFECTS: If inspection reveals an unsafe or defective condition, remove the Tripod from service immediately and contact
3M regarding replacement or repair. Do not attempt to repair the Fall Arrest System.
;
Authorized Repairs Only: Only 3M or parties authorized in writing my make repairs to this equipment.
5.3 PRODUCT LIFE: The functional life of the Fall Arrest System is determined by work conditions and maintenance. As long
as the product passes inspection criteria, it may remain in service.
6.0 MAINTENANCE, SERVICING, STORAGE
6.1 CLEANING: Periodically clean the Tripod’s metal components with a soft brush, warm water, and a mild soap solution.
Ensure parts are thoroughly rinsed with clean water.
6.2 SERVICE: Only 3M or parties authorized in writing by 3M may make repairs to this equipment. If the Tripod has been
subject to fall force or inspection reveals an unsafe or defective conditions, remove the system from service and contact
3M regarding replacement or repair.
6.3 STORAGE AND TRANSPORT: When not in use, store and transport the Tripod and associated fall protection equipment
in a cool, dry, clean environment out of direct sunlight. Avoid areas where chemical vapors may exist. Thoroughly inspect
components after extended storage.
 Loading...