Note on safety at work
The relevant work and operating procedures are
to be carried out carefully by trained specialists
familiar with the installation, taking into account
all the relevant safety regulations to DIN VDE/IEC
and the other relevant professional bodies,
and other local and works regulations and
instructions.
Note:
Do not walk on the top surfaces of the
switchgear panels (rupture points for
pressure relief).
6.1 Commissioning
6.1.1 Preparatory work
(Figures 3/2, 3/15, 6/1 to 6/7)
In preparation for commissioning, the following
work should be carried out prior to connection
with the high-voltage power supply.
• Check the general condition of the switchgear
for detrimental circumstances of all kinds
• Perform a visual examination of the switching
devices, withdrawable parts, isolating contacts,
insulating parts, etc
• Check the connection of the main earthing
bar to the station earthing conductor
• Check the paintwork for damage and touch
up as described in section 7.3 where necessary
• Remove all material residues, foreign bodies
and tools from the switchgear
• Clean the switchgear, rubbing down insulating
parts with a clean, soft, non-fraying and dry
cloth. Remove greasy or adhesive dirt as
described in section 7.2
• Properly refit all covers etc. removed during
as sembly and testing processes
• Perform on site power frequency voltage
testing of the main circuits to IEC 62271-200
as far as necessary. Pay special attention during
this procedure to voltage trans formers and
cables, etc
• Switch on the auxiliary and control voltage
• Carry out test operations of switching devices
manually or by electrical control, and
simultaneously observe the relevant position
indicators
• Check mechanical and electrical interlocks
for effectiveness, without using force
• Set the protective devices in the switchgear
to the required values and check their function
with test equipment
• Instruct the local operators in the fundamental
details of regular handling of the switchgear
• Check the readiness for operation and switching
status of electrical systems upstream and
down stream from the switchgear
• Display the instruction manual in a position
accessible to the operator at any time
Depending on the allocation of responsibilities,
it may also be necessary to check the following
equipment in areas adjacent to the switchgear.
• Power cables
• Auxiliary cables
• Auxiliary power source and its polarity
• Remote control system
• Complete earthing system
• Switch room equipment
• Switch room condition
6.1.2 Start-up
• Comply with all relevant safety regulations
• Ensure that the circuit-breakers in the system
are in the OFF position
• Remove any existing earthing and
short-circuiting connections in the critical
switching area
• Energize the feeder cables
• Connect the switchgear step by step, observing
the signals and indicators
• Check that the relevant conductors are in
phase, as far as necessary when several
incoming feeder cables and switchgear
sections are concerned (see also section 6.3.2)
• Carry out all measurements and check all
functions dependent on the high-voltage
power supply being connected
• Watch out for irregularities of any kind
6.2 Switching operations
Carry out switching operations with the
panel doors closed.
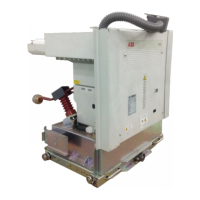
6.2.1 Withdrawable circuit-breaker part
(Figures 3/2, 6/1 to 6/7)
Manual insertion from the test/disconnected
position to the service position:
• Connect control wiring plug 10.2
• Close the front door
• Ensure that the circuit-breaker is in the OFF
position
• Fit hand crank 146 on square spigot 52.1 of
the spindle mechanism 52
• Turn the crank clockwise through approx. 45
turns until the stop is reached and the
withdrawable part is in the service position
• Observe the position indicator
• Remove hand crank 146
Note:
The withdrawable part must not be stopped
at any position in the travel range between the
service position and test/disconnected
position!
Manual withdrawal from the service position
into the test/disconnected position
• Ensure that the circuit-breaker is in the OFF
position
• Reverse the procedure described above for
in sertion into the service position
Note:
Do not use force to move withdrawable parts
with blocking magnet Y0 in the event of a
voltage drop. If this occurs they are blocked
along the whole travel range between the
service position and test position. To remove
the interlock, consult section 7.4.2.
Withdrawal from the test/disconnection
position into the removed position
• Open the door of the circuit-breaker
compartment
• Release control wiring plug 10.2 and engage
it in the storage position on the withdrawable
part
• Deblock the interlock yoke by moving the sliding
handle 51.2 inwards against the springs to
release the withdrawable part 50
• Move the withdrawable part out of the panel
• Close the panel door
Insertion from the removed position into the
test/ disconnected position
• Carry out the procedure as described above
for withdrawal, changing the order accordingly
• When the switchgear is in operation, observe
all the operating data and condition indications
in the secondary area and watch for any
irregulatities
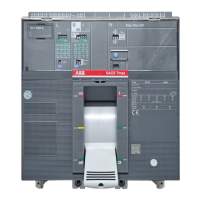
6.2.2 Circuit breaker
(Figures 6/1 to 6/5)
For operation refer to Manual BA 483/02E,
VD4, vacuum circuit breaker on withdrawable
part or 1YHA000046-en, HD4 SF
6
circuit breaker.
6.2.3 Earthing switch
(Figures 3/2, 6/7 to 6/12)
For operation refer also to instruction manual
1YHA000063-en, EK6 earthing switch.
The earthing switch type EK6 has a snap-action
closing mechanism which is independent of
the rotation of the drive shaft. The earthing
switch type EK6 is only enabled for switching
when the withdrawable part 50 is in the test/
disconnected position or removed from the
switchgear panel. Only switch earthing
switches on when the doors are closed. Only
open the rear doors of the panel when the
earthing switch is closed.
Opening and closing
• Press slide 14.2 on the operating lever recess
socket down (When the switch is closed, it is
already in this position!)
• Fit operating lever 122 to hexagonal shaft
14.1, which is now released for operation
Note:
Fit operating lever 122 to the hexagon shaft
poin-ting either upwards or downwards for
each swit-ching operation in such a way that it
is not obstructed at the sides, even in limited
space.
• Turn the lever clockwise through approx.
180° until the stop is reached to close the
earthing switch, or anti-clockwise until the
stop is reached to open the earthing switch
• Observe the mechanical/electrical switch
position indicator
• Remove operating lever 122. Slide 14.2 remains
open if the earthing switch is in the closed
position
Make sure that the operating lever is turned
right up to the stop in the opening process, to
ensure that the earthing switch is in its defined
limit position.
The operating mechanism can also be fitted
with a blocking magnet.
6.3 Test procedures
6.3.1 Testing the off-circuit condition
The panels can be fitted with a capacitive voltage
indication system including the corresponding
(hand-held) plug-in indicator for testing of the
off-circuit condition.
 Loading...