Where show tools that are used to do measuring and image analysis. Definition and function of different
tools has been given in chapter “Icons definitions”. Users can choose to hide or show this toolbar
window following path: 'View→Toolbars and Docking Windows→Standard’.
③Pictures browser:
Where users review all pictures they’ve captured. Users can also edit the picture by right-clicking the
picture and open it in the main operating window. Choose 'View→Toolbars and Docking
Windows→Picture browser' to show or hide this window.
④Secondary operating window:
This window is to digital zoom in the area around cursor. With help of this window, the result of
measuring can be much more precisely.
⑤Main operating window:
This windows shows the full view from the microscope. And it is also the place where users do measuring
and image analysis.
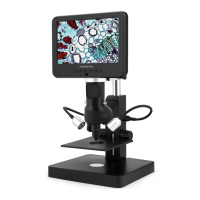
⑥Calibration Management and Measuring Results:
These two windows shows at the same place, users can switch them by clicking.
◆Calibration Management ◆Measure Results
→Shows the list of different → Shows the size of the
Calibrations. Users can choose whole view. Users Can
to apply or delete. change it in 'File→
Videosetting→Video
capture pin→(S)’.
→Where to set new → Shows all results of
Calibrators. (The details of how measuring.
to set calibrator would be
given in another chapter)
*Operating Steps
1
)
Material: A computer (Windows system, with software 'Microscope Measure
’
); USB microscope (device
name: 'USB CAMERA
’
), A ruler.
2
)
Steps