Other important characteristics of the instrument are: program
parameters protection using personalised password, on/off
instrument switching (stand-by) using the front keys or the
digital input, parameters configuration via the A01 device, the
ability to store two temperature SP that can be switched and
the possibility of power supply in the range 100... 240 VAC.
1.2 - FRONT PANEL DESCRIPTION
2 - PROGRAMMING
2.1 - PROGRAMMING OF THE SET POINT
Press the key P then release it and the display will show SP 1 (or
SP 2 if the second set is active at that time) alternating with the set
value (see selection of the active set point).
To change it press the UP key to increase the value or DOWN to
decrease it.
These keys increase or decrease the value one digit at a time, but
if the button is pressed for more than one second the value
increase or decreases rapidly, and after two seconds pressed, the
speed increases even more to all the desired valued to be reached
rapidly.
Exiting the Set mode is achieved by pressing the P key or
automatically if no key is pressed for 15 seconds. After that time
the display returns to the normal function mode.
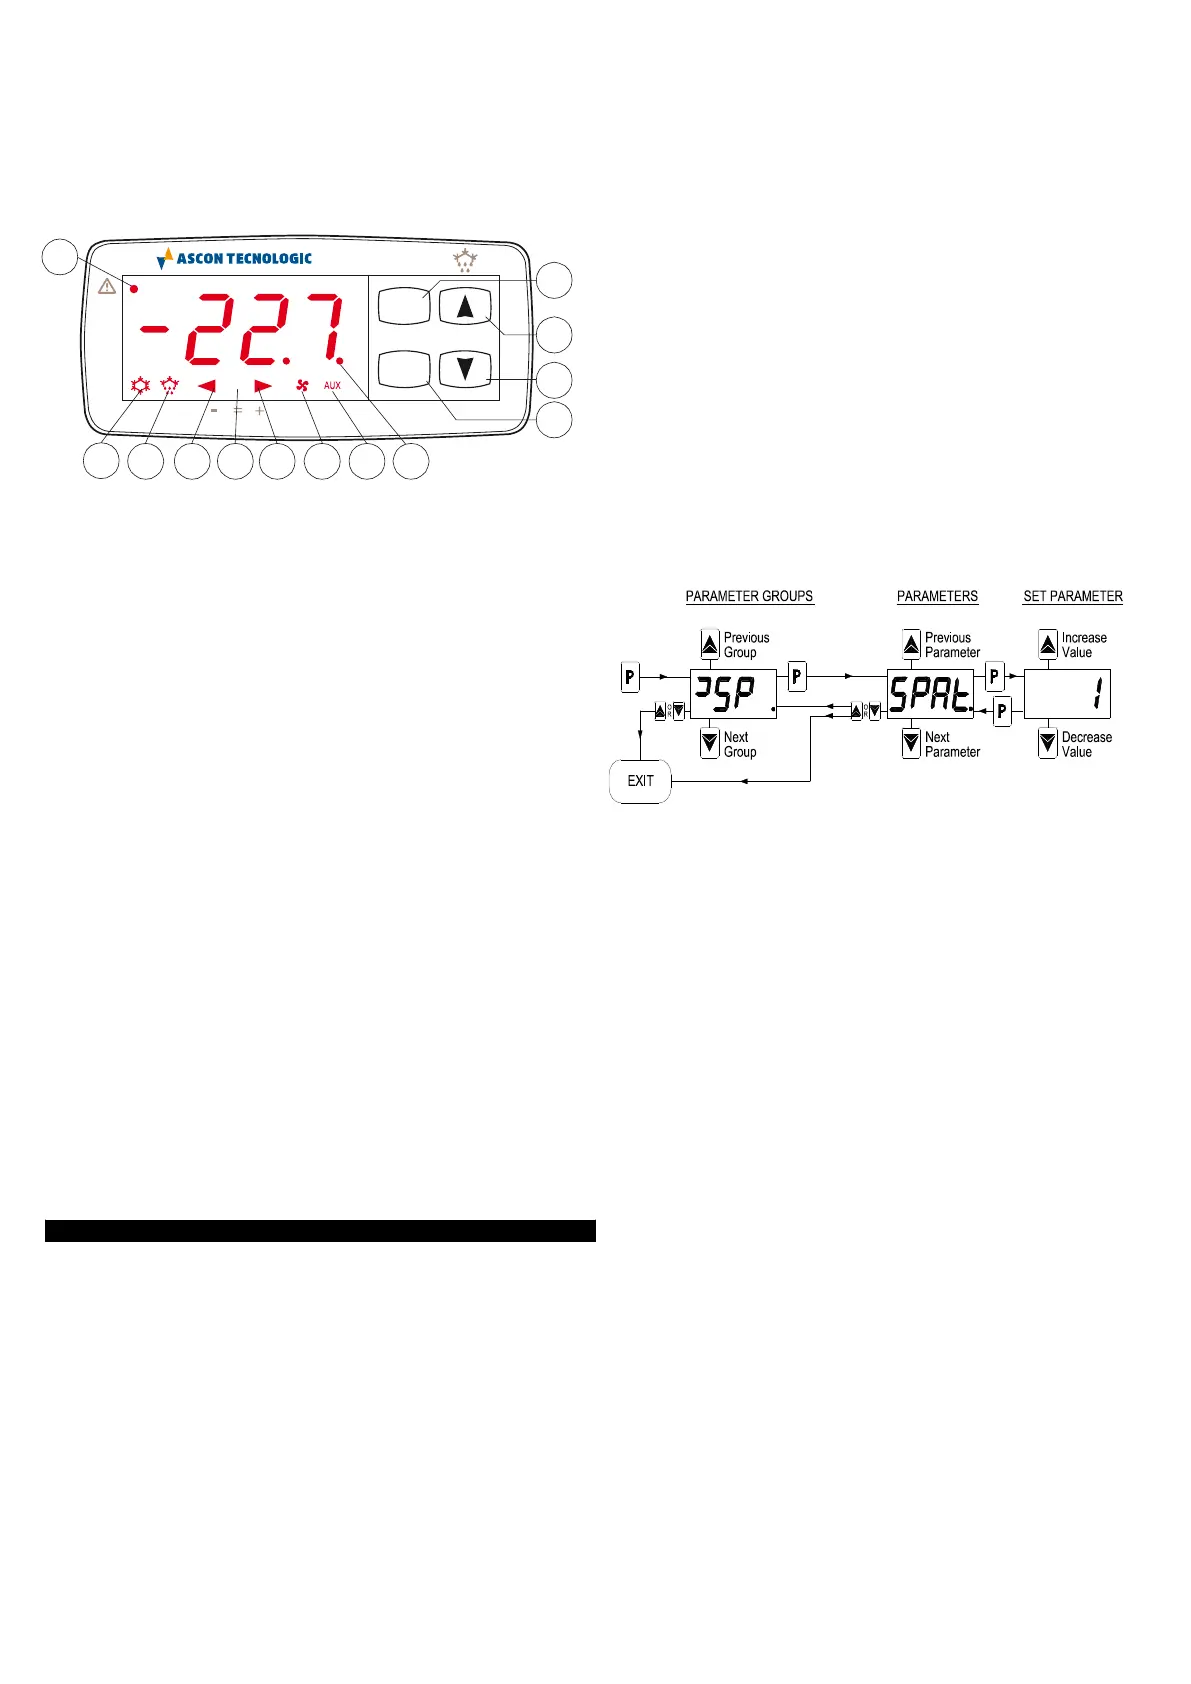
2.2 - PARAMETERS PROGRAMMING
To access the instrument’s function parameters, press the key P
and keep it pressed for about 5 seconds, after which the SET led
will light up, the display will visualised the code that identifies the
first group of parameters (“
]
SP “) and the group of parameters that
are to be edited are selected by pressing the UP and DOWN keys.
Once the group of parameters has been selected, press the P and
the code that identifies the first parameter in the selected group will
be visualised.
Again using the UP and DOWN keys, the desired parameter can be
selected and pressing the P key, the display will alternately show
the parameter code and its setting that can be changed with the UP
and DOWN keys.
Once the desired value has been set, press the key P again: the
new value will be memorised and the display will show only the
abbreviation of the selected parameter.
Pressing the UP and DOWN keys, it is possible to select another
parameter (if present) and change it as described.
To return to select another group of parameters, keep the UP or the
DOWN key pressed for about 1 second, after which the display will
return to showing the code of the parameter group.
Release the pressed key and using the UP and DOWN keys it will
be possible to select another group (if present).
To exit the programming mode, do not press any key for about 20
seconds, or keep the UP or DOWN key pressed until it exits the
programming mode.
Longer
Hold
2 sec.
Hold for
2 sec.
Hold for
5 sec.
Hold for
2.3 - PARAMETER PROTECTION USING THE PASSWORD
The instrument has a parameter protection function using a
password that can be personalised, through the “PASS”
parameter in the “
]
PAn” set.
If one wishes to have this protection, set the password number
desired in the parameter “PASS”.
When the protection is working, press the P key to access the
parameters and keep it press for about 5 seconds, after which the
LED SET will flash and the display will show “0” .
At this point, using the UP and DOWN keys, set the password
number programmed and press the key "P".
If the password is correct, the display will visualise the code that
identifies the first group of parameters(“
]
SP “) and it will be possible
to programme the instrument in the same ways described in the
previous section.
Protection using a password can be disabled by setting the
parameter “PASS” = OFF.
2.4 - PARAMETERS PROGRAMMING LEVELS
The instrument has two parameter programming levels.
The first level (“visible” parameters) is accessed according to the
procedure described above (with or without password request)
while the second level (“hidden” password) can be accessed
according to the following procedure.
Remove the power supply to the instrument, press the key P and
return power to the instrument, keeping the key pressed.
After about 5 sec. the SET led will light up, the display will show the
code that identifies the first group of parameters(“
]
SP “) and it will
be possible to set the parameters of the instrument using the same
programming procedure described previously.
Once the parameter has been selected and the SET is on, it means
that the parameter can be programmed even on the first level
("visible”).
If the LED is off it means that the parameter can only be
programmed on this level (i.e. “hidden”).
Ascon Tecnologic - TLY25 - OPERATING INSTRUCTIONS - PAG. 2
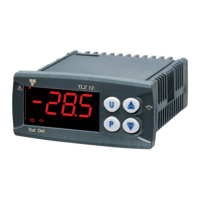
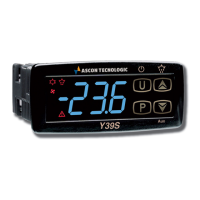
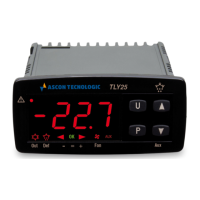
1 - Key P : Used for setting the Set point and for programming the
function parameters
2 - Key DOWN/Aux : Used for decreasing the values to be set and
for selecting the parameters. It can also be prog rammed via the
parameter “Fbd” to carry out other functions such as activating the
Aux output, starting up the continuous cycle, selecting the active
set point or turning on and off (stand-by) the device (see par. 4.12).
3 - Key UP/DEFROST : Used for increasing the value to be set, for
selecting the parameters and for activating manual defrosting.
4 - Key U : Used for visualising the temperatures taken by the cell
probes and evaporator (Pr1 and Pr2) and the internal clock (if
present). It can also be prog rammed via the parameter “USrb” to
carry out other functions, just like the key DOWN/AUX (see par.
4.12).
5 - Led OUT : Indicates the compressor output status (or the
temperature control device) on (on), off (off) or inhibited (flashing) 6
-
Led DEF : Indicates defrosting in prog ress (on) or dripping
(flashing).
7 - Led FAN : Indicates fan output status on (on), off (off)
or delayed after defrosting (flashing)
8 - Led AUX : Indicates AUX output status on (on), off (off) or
inhibited (flashing)
9 - Led AL : Indicates the alarm status (on), off (off) and silenced
or memorized (flashing)
10 - Led SET : Indicates the input in prog ramming mode and the
programming level of the parameters. It also serves to indicate the
Stand-by status.
11 - Led - : Indicates that a low temperature alarm is in progress
(lit) or that a low temperature alarm has been memorised (flashing).
12 - Led OK : Indicates that no alarms are in progress
13 - Led + : Indicates that a high temperature alarm is in progress
(lit) or that a hig h temperature alarm has been memorised
(flashing).
9
TLY25
4
U
3
P
OK
2
Out Def Fan
Aux
1
5 6 11 12 13 7 8 10
 Loading...