soft cloth.
detergent with a clean soft cloth. Be sure that no uids enter the unit, as this will
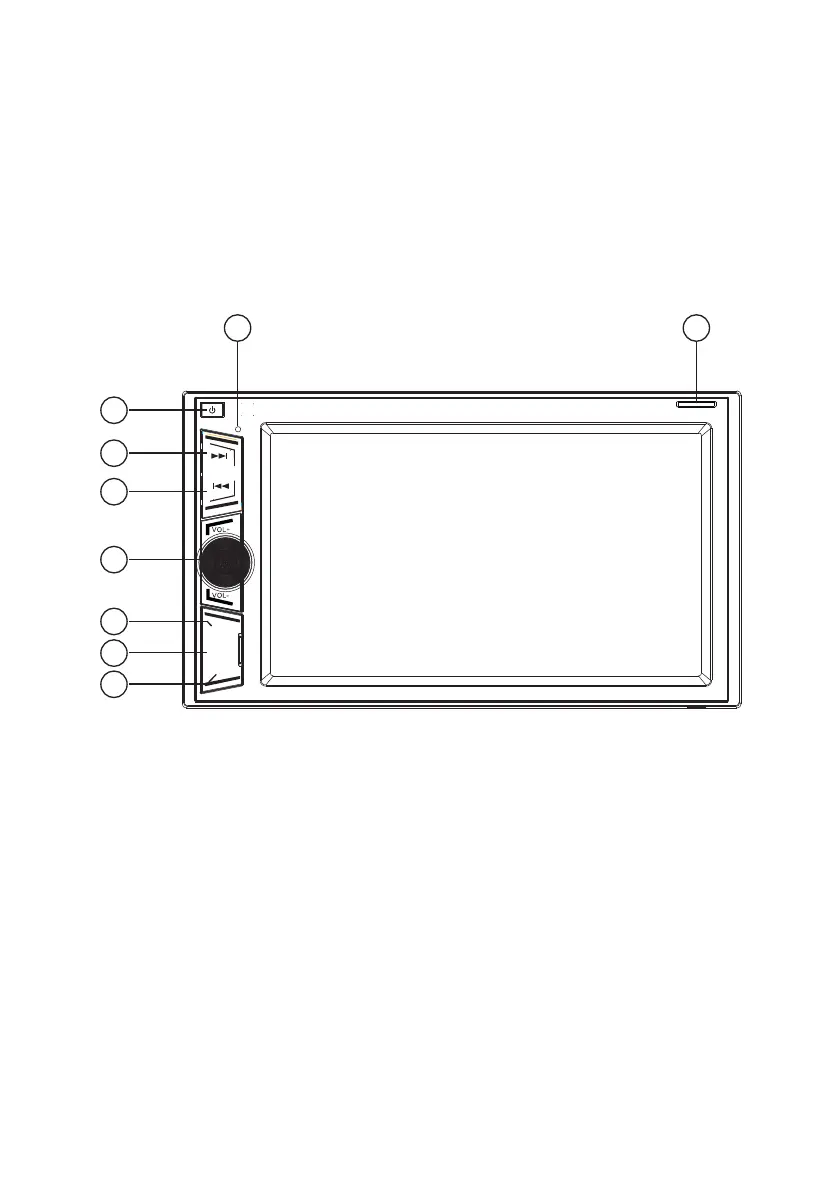
1. Power On/O: Short press to turn on. Long press to turn o.
2. Seek/Tune Up ►►I: Short press for one forward frequency step tuning or next
3. Seek/Tune Down I◄◄: As above, but for reverse step/scan.
4. Volume Knob: Rotate to increase or decrease volume. Press to mute.
5. USB Input (Behind Panel): Multimedia le playback via USB.
6. AUX Input (Behind Panel): 3.5mm input for auxilary audio.
7. Reset Button (Behind Panel): Press to reset the unit to factory default settings.
8. N/A
9. Micro SD Mapping Card Slot: Multimedia le playback via Micro SD card.
User Manual
)
)
TF
1
2
3
4
5
8 9
6
7
1. Power Button
2.
Seek/Tune Up (
3.
Seek/Tune Down (
4. Volume Knob
5. USB Port (Behind Panel)
6. Reset Button (Behind Panel)
7. AUX Input (Behind Panel)
8. Microphone (N/A)
9. Micro SD Card Slot
1. POWER
Short press to turn the unit on. Long press to turn the unit off.
2/3.
SEEK+/SEEK-
Short press to change the radio frequency by one step.
Long press to scan for the next/previous station.
In USB/SD mode short press to select next/previous song.
4. Volume - / +. (VOL - / +. PUSH)
Rotate knob to increase and decrease volume.
Push knob to enter sound settings interface. Here parameters
can be adjusted to suit preferences.
USB slot (USB) - Behind Panel
For USB input of multimedia files.
5. Reset button (RST)
When the system works unusually, press this button system to
reset to factory default settings.
6. AUX Input (AUX) - Behind Panel
3.5mm Jack for input of auxiliary audio.
7. Internal Microphone
Not in use (AX1860NAV includes an External Microphone).
8. SD card slot (SD) - Behind Panel
This SD card slot is for multimedia cards only.
A Map card cannot be placed in this slot.
1. Select the FM1, FM2, FM3, AM1 or AM2 radio band.
2. Frequency display:
Switches to previous frequency manually.
Switches to next frequency manually.
3. Displays preset channel list. Press & hold keys (P1-P6) to store
current broadcast frequency.
4. Multi function menu:
Tunes in a station with good reception automatically.
Short touch for non stop seek tuning, touch again to cancel.
Long touch for switching the preset channels, long touch again to cancel.
Change between LOC and DX mode.
Press to see more functions.
Touch <RDS> to active the RDS function.
EQ and FAB setting.
5. Mono and DX:
Displays LOC or DX.
Radio Basic Operation
CChhaannnneell Preset
1. Press and hold the P1 key to store the current channel to P1 key.
2. Press
and hold the P2 key to store the current channel to P2 key.
3. Repeat for P3 to P6 if required.
Displays Mono or Stereo, decided by the radio.
Do NOT ground the speaker wiresVoltage range: 10-32V