1. Remove the stainless steel platter
from the scale platform.
2. Break the lead seal and open the
cavity cover. (Fig. 1)
3. Disconnect the connectors inside
the cavity. (Fig. 2)
4. Turn over the scale (Fig. 3) then,
a) Remove all (8) screws.
b) Put these (4) screws aside,
they will be used to fix the pole
to the platform.
c) Loosen (2) cable stoppers.
5. Fix the indicator to the U-shape
bracket with (2) rotary knobs. (Fig. 4)
6. Install the indicator assembly to the
pole with (2) screws and nuts. (Fig. 5)
7. Insert the indicator cable into the
pole. (Fig. 6)
8. Attach the pole onto the scale
platform by fixing the (4) screws
(removed in step 4c), then fix the
cable with a cable stopper. (Fig. 7)
9. Lead the cable into the base cavity
and connect the two plugs. (Fig. 8)
10. Put the cavity cover back and fix
the (2) screws.
11. Put the stainless steel platter back.
12. The scale is ready for use.
• Pole
• Screw and Nut Sets
• U-Shape Indicator Bracket with 2 Knobs
• Indicator Bracket
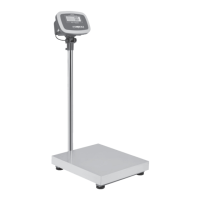
INSTALLATION OF OPTIONAL POLE
4.
PACKING LIST
UNPACKING
& ASSEMBLY
Fig. 1
Fig. 2
Fig. 3
Fig. 4
Fig. 5
Fig. 7
Fig. 7
Fig. 6
 Loading...