18
3INSTALLATION AND DEINSTALLATION
2.1 UNPACKING, ASSEMBLING AND CONNECTING THE MACHINE
ALS
20X
256
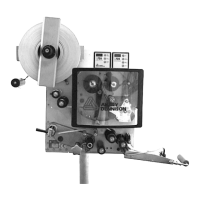
2.1.4 Attaching the dispensing edge
L-shaped dispensing edge
Tools:
– 8 mm hexagon socket driver
Both the dispensing edge holder [12D] and the mount-
ing flange on the machine casing have two concentric
rings of holes [12B] on the connecting surfaces. Two
pins [12C] that fit into these holes are provided with the
dispensing edge holder. To secure the dispensing edge
holder so it cannot swivel, the pins are located in dia-
metrically opposite holes. By replacing the pins in adja-
cent holes, the mounting angle of dispensing head
holder can be adjusted in 15° increments [13].
Locate the pins in diametrically opposite holes.
– Choose either inner or outer circle of holes, depend-
ent on angle required.
Fit the dispensing edge holder onto the pins at the
required angled.
Fix the dispensing edge holder in place with
screw [12A].
[11] Dispensing edge holder with dispensing edge.
[12] Attaching the dispensing edge holder (D).
[13] The mounting of the dispensing edge holder assembly can
be adjusted in 15° gradations as required
 Loading...