Do you have a question about the Avery Dennison ALS 256 and is the answer not in the manual?
Essential safety guidelines and qualification requirements for safe operation.
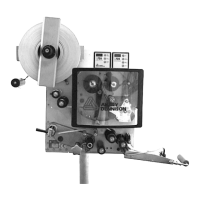
Detailed list and description of all physical parts of the dispenser.
Explains the functions of the control panel's LEDs, display, and buttons.
Explains the fundamental working principle of the label dispenser.
Lists detailed technical data, including speeds, dimensions, and power.
Specifies processor, memory, and control panel hardware details.
Details the primary operating mode for dispensing labels.
Explains how to adjust dispensing speed and start offset.
Describes entering configuration mode and navigating menus.
Details functions within the LABEL SETUP menu.
Details functions within the MACHINE SETUP menu.
Covers power supply connection and related safety precautions.
Provides instructions and warnings for connecting various sensors.
Guides through removing spent backing paper and inserting a new label roll.
Provides threading guides for different dispensing edge configurations.
Details threading the label strip at the dispensing edge for various configurations.
Explains how to thread the label roll onto the drive roller and dancer arm.
Guides on how to fasten the label roll to the rewinder mechanism.
Covers the procedures for turning the unit on and off.
Explains how to start label dispensing with or without a product sensor.
Details how to stop and resume label dispensing operations.
Explains how to set the label pitch (length plus space).
Guides on setting the label stop position for accurate placement.
Details setting dispensing speed, fixed or adaptive.
Lists various error messages, their causes, and recommended actions.
Continues the list of error messages and their resolutions.
| Print Method | Thermal transfer |
|---|---|
| Print Resolution | 300 dpi |
| Max. Print Width | 4.09 inches |
| Media Type | Labels, tags, tickets |
| Ribbon Width | 4.33 inches |
| Interfaces | USB, Ethernet, Serial |
| Connectivity | USB, Ethernet, Serial |
| Display | LCD (optional) |
| Keyboard | External keyboard support via USB |
| Supported Label Materials | Paper, synthetic |