3
CONTENTS
ALS
20X
256
1 Please observe the following
1.1 General information
1.1.1 Validity and applicability of this manual . . . . . 4
Contents . . . . . . . . . . . . . . . . . . . . . . . . . . . . . . . 4
Technical State . . . . . . . . . . . . . . . . . . . . . . . . . . 4
Liability . . . . . . . . . . . . . . . . . . . . . . . . . . . . . . . . 4
Copyright notice . . . . . . . . . . . . . . . . . . . . . . . . . 4
Manufacturer . . . . . . . . . . . . . . . . . . . . . . . . . . . . 4
1.1.2 Conventions and information . . . . . . . . . . . . . 5
Explanation of symbols . . . . . . . . . . . . . . . . . . . . 5
Warnings concerning dangers and risks . . . . . . . 5
Illustrations . . . . . . . . . . . . . . . . . . . . . . . . . . . . . 5
Symbols for keys . . . . . . . . . . . . . . . . . . . . . . . . . 5
Functions. . . . . . . . . . . . . . . . . . . . . . . . . . . . . . . 5
Supplemental information . . . . . . . . . . . . . . . . . . 5
1.1.3 Notes on installation and repair work . . . . . . . 6
General information. . . . . . . . . . . . . . . . . . . . . . . 6
Environmental protection. . . . . . . . . . . . . . . . . . . 6
Rules for electromagnetic compatibility. . . . . . . . 7
1.2 Safety instructions
1.2.1 Information and qualifications . . . . . . . . . . . . . 8
Qualification. . . . . . . . . . . . . . . . . . . . . . . . . . . . . 8
Pay attention to the information. . . . . . . . . . . . . . 9
Information must be made available . . . . . . . . . . 9
1.2.2 Machine operating safety . . . . . . . . . . . . . . . 10
Installation, maintenance. . . . . . . . . . . . . . . . . . 10
Protection measures in applicator mode . . . . . . 10
After all servicing or repair work . . . . . . . . . . . . 10
1.2.3 Safe operation. . . . . . . . . . . . . . . . . . . . . . . . 11
Protect against injuries that can result from
electrical current . . . . . . . . . . . . . . . . . . . . . . . . 11
Protection against injuries that can result from
mechanical actions . . . . . . . . . . . . . . . . . . . . . . 12
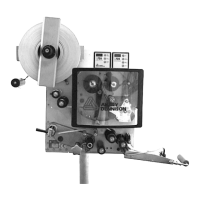
2 Installation and deinstallation
2.1 Unpacking, assembling and
connecting the machine
2.1.1 Transport. . . . . . . . . . . . . . . . . . . . . . . . . . . . 13
2.1.2 Unpacking . . . . . . . . . . . . . . . . . . . . . . . . . . . 13
2.1.3 Setting up . . . . . . . . . . . . . . . . . . . . . . . . . . . 14
For machines held from the rear side . . . . . . . . 15
Holding machine in place by side plate or base
plate. . . . . . . . . . . . . . . . . . . . . . . . . . . . . . . . . . 17
2.1.4 Attaching the dispensing edge . . . . . . . . . . . 18
L-shaped dispensing edge . . . . . . . . . . . . . . . . 18
V-shaped dispensing edge . . . . . . . . . . . . . . . . 19
Adjustable dispensing edge holder . . . . . . . . . .19
2.1.5 Connecting to the mains power supply . . . . 20
Checking the supply voltage setting . . . . . . . . .21
Plugging in the power lead . . . . . . . . . . . . . . . .22
2.1.6 Connecting the external operator panel. . . . 23
Mounting the external operator panel . . . . . . . .23
2.2 Connecting the sensors
2.2.1 Photoelectric label sensor . . . . . . . . . . . . . . 24
Connecting the photoelectric sensor . . . . . . . . .24
Pin assignment . . . . . . . . . . . . . . . . . . . . . . . . .24
Connection diagram . . . . . . . . . . . . . . . . . . . . .25
Adjusting the Avery sensor . . . . . . . . . . . . . . . .26
Switching the Avery sensor - PNP/NPN . . . . . .27
Adjusting the Wenglor photoelectric sensor
automatically . . . . . . . . . . . . . . . . . . . . . . . . . . .28
Adjusting the Wenglor photoelectric sensor
manually . . . . . . . . . . . . . . . . . . . . . . . . . . . . . .28
2.2.2 Alternative label sensor . . . . . . . . . . . . . . . . 29
Connecting the sensor. . . . . . . . . . . . . . . . . . . .29
Pin assignment . . . . . . . . . . . . . . . . . . . . . . . . .29
Connection Diagram . . . . . . . . . . . . . . . . . . . . .30
Example: capacitive label sensor . . . . . . . . . . .30
2.2.3 Changing light/dark switching at the product
sensor or the alternativ label sensor . . . . . . 32
Gen. 1 . . . . . . . . . . . . . . . . . . . . . . . . . . . . . . . .32
Gen. 2 . . . . . . . . . . . . . . . . . . . . . . . . . . . . . . . .33
2.2.4 Photoelectric product sensor . . . . . . . . . . . . 34
Connecting the photoelectric sensor . . . . . . . . .34
Pin assignment . . . . . . . . . . . . . . . . . . . . . . . . .34
Connection Diagram . . . . . . . . . . . . . . . . . . . . .34
2.2.5 Photoelectric roll diameter sensor . . . . . . . . 35
Installing . . . . . . . . . . . . . . . . . . . . . . . . . . . . . .35
Connecting the OD sensor . . . . . . . . . . . . . . . .36
Pin assignment . . . . . . . . . . . . . . . . . . . . . . . . .36
Connection diagram . . . . . . . . . . . . . . . . . . . . .36
Enabling. . . . . . . . . . . . . . . . . . . . . . . . . . . . . . .37
Setting the roll diameter. . . . . . . . . . . . . . . . . . .37
Function test . . . . . . . . . . . . . . . . . . . . . . . . . . .38
2.2.6 Rotary encoder. . . . . . . . . . . . . . . . . . . . . . . 39
Requirements for rotary encoder: . . . . . . . . . . .39
Connecting the rotary encoder . . . . . . . . . . . . .40
Connection diagram . . . . . . . . . . . . . . . . . . . . .40
2.3 Decommissioning, Dismantling,
Disposal
2.3.1 Take the machine out of operation. . . . . . . . 41
2.3.2 Dismantling the machine . . . . . . . . . . . . . . . 41
2.3.3 Machine disposal . . . . . . . . . . . . . . . . . . . . . 41
 Loading...