Chapter 2: Installing XMON 15
Connecting the Control Cable Breakout Adapter
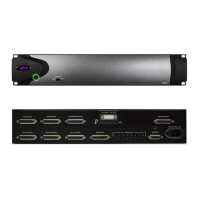
The Control Cable Breakout Adapter lets the XMON EUCON Software Application communicate with and control the XMON
hardware.
To connect the Control Cable Breakout Adapter and M-Audio MIDI Uno:
1 Connect the 15-pin end of the Control Cable Breakout Adapter to the Control port on the back panel of the XMON hardware.
2 Connect the M-Audio Uno’s MIDI OUT cable (four feet, attached) to the MIDI IN port on the Control Cable Breakout Adapter.
3 Connect the M-Audio Uno’s MIDI IN cable (four feet, attached) to the MIDI OUT port on the Control Cable Breakout Adapter.
If the devices are more than four feet apart, attach longer MIDI cables to the MIDI In and MIDI Out cables on the M-Audio Uno.
4 Use a 1/4-inch TRS cable (not included) to connect the Headphone Out on the Control Cable Breakout Adapter to the Headphone
jack on the back of the MC Pro (or bottom of the System 5-MC frame).
Connecting a Talkback Microphone
The XMON EUCON Software Application supports both internal and external Talkback mic connections on XMON.
To connect the internal Talkback microphone:
1 Use a mic cable (not included) to connect the internal Talkback Microphone output on the MC Pro or System 5-MC to the input
of a phantom power supply (not included).
Since this connector does not provide the 48 V required to power the console’s microphone, you must use an external phan-
tom power supply.
2 Connect the output of the phantom power supply to the Talkback input on the Control Cable Breakout Adapter.
To connect the external Talkback microphone:
Connect a microphone to the External Talkback Microphone input on the back panel of the XMON hardware.
This connection provides an 18 V power supply for a condenser microphone.