10
— — — — — — — — — — — — — — — — — — — — — — — — — — — — — — — — — — — — — — — — — — — — — — — — — — —
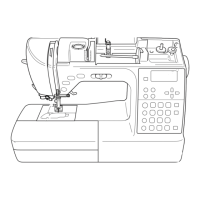
Needle and presser foot
section
a Buttonhole lever (page 88)
Lower the buttonhole lever when sewing buttonholes
and bar tacks.
b Thread guide disk (page 32)
Pass the thread through the thread guide disk when
using the needle threader to thread the needle.
c Needle bar thread guide (page 32)
Pass the upper thread through the needle bar thread
guide.
d Needle plate (page 67)
The needle plate is marked with guides for sewing
straight seams.
e Needle plate cover (page 170)
Remove the needle plate cover to clean the bobbin case
and race.
f Bobbin cover/bobbin case (page 26)
Remove the bobbin cover, and then insert the bobbin
into the bobbin case.
g Feed dogs (page 90)
The feed dogs feed the fabric in the sewing direction.
h Presser foot (page 41, 50)
The presser foot applies pressure consistently on the
fabric as the sewing takes place. Attach the appropriate
presser foot for the stitch selected.
i Presser foot holder (page 43)
The presser foot is installed onto the presser foot holder.
Right-side/rear view
a Handle
Carry the sewing machine by its handle when
transporting the machine.
b Handwheel (page 50)
Turn the handwheel toward you (counterclockwise) to
raise and lower the needle to sew one stitch.
c Embroidery card slot (page 150)
Insert the embroidery card.
d USB port (for a USB flash drive (USB flash memory))
In order to import patterns from a USB flash drive (USB
flash memory), plug the USB media directly into the
USB port.
e Air vent
The air vent allows the air surrounding the motor to be
exchanged. Do not cover the air vent while the sewing
machine is being used.
f Main power switch (page 15)
Use the main power switch to turn the sewing machine
on and off.
g Foot controller jack (page 52)
Insert the plug on the end of the foot controller cable
into the foot controller jack.
h Power supply jack (page 15)
Insert the plug on the power supply cord into the power
supply jack.
i Drop feed lever (page 90)
Use the drop feed lever to lower the feed dogs.
Memo
z Refer to pages 9 through 12 while you are
learning to use your machine.