ESM-UM-03099-EN-02
• METERS MUST OPERATE IN A COMPLETELY FILLED LINE AT ALL TIMES. THE DOWNSTREAM PIPING MUST
ALWAYS BE ARRANGED TO PROVIDE SUFFICIENT BACK PRESSURE TO MAINTAIN A FULL LINE AT THE METER. BY
ELIMINATING AIR IN THE LINE, AS WELL AS SUDDEN FLOW SURGES, INACCURATE REGISTRATION AND DAMAGE TO
THE METER CAN BE AVOIDED.
Pre-Installation
Take into account the following considerations before you begin an E-Series Ultrasonic meter installation:
• Inspect the piping around the meter for suitable conditions. The service line, valves, connections and meter must be
watertight. Repair the piping system if pipes are corroded or damaged.
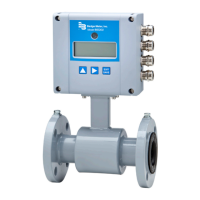
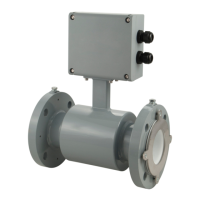
• Install the meter in the pipeline in a horizontal or vertical position so that the flow arrow on the meter housing points in
the same direction as water flow. Registration should be upright and protected from damage, freezing and tampering.
• Verify meters are correctly programmed.
• Position the meter so it is accessible for installation, removal and reading.
• The line opening for the meter should match the lay length of the meter, allowing slight additional space for coupling
gaskets. The inlet and outlet sides of the meter should be axially aligned to the pipe.
• The installed meter must not be an obstacle or a hazard to the customer or interfere with public safety.
• To avoid cavitation, always install control valves downstream of the meter. Never install the meter on a pump suction side.
• Consider maximum flow rates when sizing and selecting the appropriate meter for the application.
• Pump discharge should never be installed in proximity of the meter.
• Externally weighted check valves and pressure reducing devices should not be located in proximity of the meter.
Installation Instructions
1. Begin at this step when cutting in for new service. When cutting in is not required, begin at step 2.
• Close the curb (shutoff) valve to relieve water pressure in the line before starting the cutting operation. Provide a
high-quality upstream shutoff valve with a low pressure drop.
• Flush the pipe to clear chips, pipe dope or other plumbing residue.
2. Close the meter inlet-side valve.
3. Open a faucet and wait until water ow stops to depressurize the system. Do not remove the meter until the ow stops.
DEPRESSURIZE THE LINE BEFORE STARTING ANY DISASSEMBLY OPERATION. REMOVING A METER THAT IS UNDER
LINE PRESSURE CAN RESULT IN COMPONENTS BECOMING PROJECTILES, CAPABLE OF CAUSING PERSONAL INJURY.
4. Check valves and make necessary repairs to the curb (shuto) valve or inlet side valve if necessary.
5. Before installing or removing a meter, close the outlet-side valve to relieve pressure. Protect the area around the meter
against potential spills or leaks that could occur.
6. To replace an existing meter continue with step 7. To install a new meter skip to step 9.
7. Loosen the meter coupling nuts or ange bolts, and remove the meter and old gaskets.
8. Clean the coupling nuts or ange bolts, removing any pipe dope or dirt.
9. Check the existing position for proper alignment and spacing. Correct any misalignment or spacing issues.
10. Place the connection gaskets inside the connection coupling nuts.
11. Install the meter in the pipeline in a horizontal or vertical position with the flow arrow on the meter pointing in the
direction of flow. Registration should be upright.
continued on next page
Installation
Page 7 May 2021

 Loading...