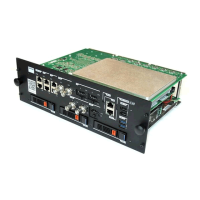
5. ICMP service procedure
5. ICMP SERVICE PROCEDUR E
About this chapter
This chapter describes how to removal and installation instructions of the ICMP and ICMP HDD. Further-
more, the battery replacement, the RAID controller replacement and ICMP HDD are described as well.
Overview
• Removing the ICMP
• Installing the ICMP
• Removing a HDD from the ICMP
• Installing a HDD into the ICMP
• Replacement of the battery
• RAID controller replacement
5.1 Removing t he ICMP
WARNING: Power down the projector and let it cool down before starting the installation
procedure. You will find in the installation manuals of each projector t he way to s witch
off your installation.
CAUTION: Wear a w rist band which is connected to the ground while handling the elec-
trostatic discharge sensitive parts.
Necessary tools
•7mmflat screwdriver.
• PH2 Phillips screwdriver.
• ESD wrist band.
How to remove the ICMP from the projector Card Cage?
1. Depending on the projector type the input cover of the projector has to be removed to access the fix-
ationscrewsoftheinstalledICMP.Usea7mmflat screwdriver. For d
etailed instructions see User &
Installation manual of the projector.
2. Release the four retaining screws at the front of the ICMP (reference 1). Use a PH2 Phillips screwdriver.
3. Pull the ICMP out of its compartment.
Note: All connections are made via the board to board connection with the back plane.
R5906594 ICMP 09/11/2016
67