PRO-800 Control
16 17Quick Start GuidePRO-800
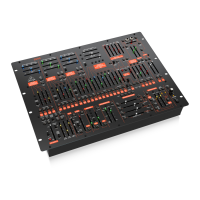
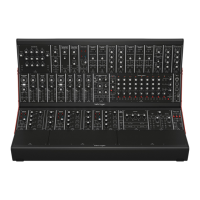
Top Panel
(1) PROGRAM DISPLAY – indicates
current program in Preset or
Manual Modes; and parameters
when using the menus.
(2) PROGRAM SELECT 0-9 switches.
used to select program numbers
0-100. There are four banks of
programs, making 400 programs
overall. These buttons are also
used to access menu functions as
described below.
(3) PRESET – when active, shows
the PRO-800 is programmed
according to memory. When
unlit indicates manual mode,
when blinking indicates that a
parameter has been edited but
not stored.
(4) PERF – switches the PRO-800
to manual mode. Front panel
controls will be active. First press
accesses patch parameters, second
accesses manual mode (display
shows P800)
(5) SETTINGS – enter the
settings menu.
(6) TUNE – activates tuning of
oscillators and lters.
(7) SYNC SOURCE – choose from
internal, MIDI, USB or Sync In.
(8) SYNC CLOCK – First press sets
clock BPM. Second press: clock
subdivision (¼, ⁄ etc)
Third press: clock in PPQN settings:
24, 48, 96, 192 are available.
(9) REC – used for storing programs
or sequences. Also used to latch
the arpeggiator.
(10) SEQ 1 – selects sequence bank 1
for recording or playback.
(11) SEQ 2 – selects sequence bank 2
for recording or playback.
(12) ARP UP DN – controls
arpeggiator by key position.
See Arpeggiator below.
(13) ARP ASSIGN – controls
arpeggiator by key order.
See Arpeggiator below.
(14) VALUE – used to adjust parameter
values such as tempo.
(15) FREQUENCY – adjusts the over a
4 octave range for both oscillators.
The frequency range can be set
using the additional parameters
menu (see below).
(16) SYNC – forces OSC A to follow
OSC B in hard synchronization.
(17) SAWTOOTH – enables a
full-level waveshape containing
all harmonics.
(18) TRIANGLE – enables a full-level
triangle wave, containing little
harmonic energy.
(19) PULSE – enables a full-level
waveshape depending on the
setting of the pulse width control.
(20) PULSE WIDTH – adjusts
the harmonic content of the
pulse wave by setting its cycle
from around 1 to 99%. 50% is
approximately a square wave.
(21) LEVEL – determines the volume
of the oscillator. Signal is clean
up to 5, then a distortion eect is
gradually introduced.
(22) FINE – raises OSC B frequency
up to one semitone for
detuning eects.
(23) FIL ENV – adjusts the level of the
lter envelope generator source
for the Polymod.
(24) OSC B – adjusts the level of OSC B
source for the Polymod.
(25) FREQ A – selects OSC A frequency
as a destination of the Polymod.
(26) FILTER – selects lter cuto
frequency as a destination of
the Polymod.
(27) UNISON TRACK – with no keys
pressed the current program will
be switched to UNISON operation
where all 8 voices are assigned to
one note monophonically. With
a chord held and unison then
engaged, the chord will track up
and down the keyboard. Pressing
the button while holding a single
note turns the Pro 800 into a
monophonic synthesizer.
(28) NOISE – increase the noise
generator level.
(29) LFO FREQUENCY – adjust the LFO
speed from about 0.25 to 20 Hz.
(30) SHAPE – LFO shape selection is
made in the additional parameters
menu and are assigned in pairs.
1. Tri-Pulse 2. Sine-Random 3.
Saw-Noise.
(31) INITIAL AMOUNT – programs
mod depth independently of an
external MOD wheel.
(32) FREQ A-B – applies LFO
modulation to both
oscillator frequencies.
(33) PW A-B – applies LFO modulation
to pulse width of both oscillators.
(34) FILTER – applies LFO modulation
to the lter cuto frequency.
(35) GLIDE – increases the portamento
between notes.
(36) CUTOFF – adjusts the cuto
frequency of the 24 dB/octave
(4-pole) low-pass lter.
(37) RESONANCE – adjusts the
resonance of the lter. This
emphasizes the frequencies
around the cuto point.
(38) ENVELOPE AMOUNT – sets the
depth of the applied envelope. If
set to 0, the lter envelope will
have no eect.
(EN) Step 2: Controls (EN) Step 2: Controls
56 57 58 59 60 61 62
3 4 5 6
10
7 8 9
1
2
11 12 13
23 24 25 26 27 28 40 41 42 43
29 30 31 32 33 34 35 44 45 46 47
16 17 18
19 51 52 53 54 55
20 21 36 37 38 39
48
49
50
22
Top Panel
Rear Panel