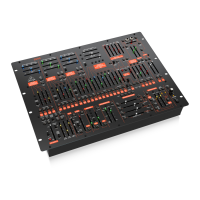
PRO-800 Control
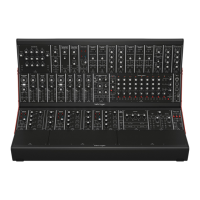
(EN) Step 2: Controls
18 19
Quick Start GuidePRO-800
(39) KEYBOARD – when the FULL
switch is selected CV is applied to
the lters cuto frequency with
the lter tracking the keyboard.
When in the OFF position notes
played higher on the keyboard
will have more of their overtones
suppressed than notes played in
the lower register. The ½ setting
gives an eect in between the
FULL and OFF settings. Full setting
allows a self-oscillating lter to
accurately track the keyboard.
(40) ATTACK – controls the attack time
of the lter’s envelope.
(41) DECAY – controls the decay time
of the lter’s envelope.
(42) SUSTAIN – controls the sustain
level of the lter’s envelope.
(43) RELEASE – controls the release
time of the lter’s envelope.
(44) ATTACK – controls the attack time
of the amplier’s envelope.
(45) DECAY – controls the decay time
of the amplier’s envelope.
(46) SUSTAIN – controls the sustain
level of the amplier’s envelope.
(47) RELEASE – controls the release
time of the amplier’s envelope.
(48) MASTER TUNE – adjust the
overall tuning of the synth
(+- 1 semitone).
(49) POWER LED – indicates power
is on.
(50) VOLUME – sets the master volume.
(51) SYNC IN – allows sync connection
to external sources.
(52) FILTER CV IN – allows the lter
cuto to be controlled by external
sources. (amount set in settings)
(53) PHONES – headphone connection.
(54) AUDIO OUT – ⁄
th
audio output.
(55) MIDI IN – accepts incoming
MIDI data from the selected
midi channel.
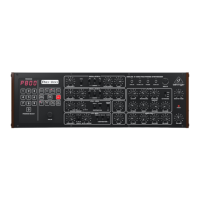
Rear Panel
(56) OUTPUT – Connect to a mixer or
audio interface ¼" Jack cable.
(57) FOOTSWITCH – connect a
footswitch for sustain control.
(58) MIDI CHANNEL SELECTION.
Move the four dip switches to
select the MIDI channel.
(59) MIDI OUT/THRU – MIDI OUT⁄
THRU for outputting MIDI data.
(60) USB PORT – Capable of sending
and receiving MIDI information
over USB. Also used for updates.
(61) POWER SWITCH – Turns the
synthesizer on and o.
(62) POWER INPUT – Connect the
supplied power supply only.
1 2 3 4
5 6 7 8
9 10 11 12