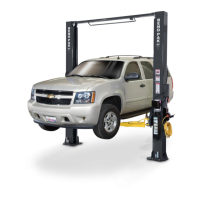
XPR-10 Series Two-Post Lifts 8 P/N 5900951 — Rev. D — May 2019
XPR-10 Series Lift components include:
• Powerside Post: The Powerside Post holds the Power Unit, the Safety Lock Release Handle,
the Lowering Handle (which is on the Power Unit), and the Power Disconnect Switch. The
Powerside Post must be on the Right (looking at the Lift from the Approach) for Asymmetric
models; it can be on the Left or the Right for Symmetric models.
• Offside Post: The other Post.
• Power Unit: Provides Hydraulic Fluid to the Lift and connects to an appropriate power source.
Includes the Up Button, the Lowering Handle, and the Hydraulic Fluid reservoir.
• Up Button: Press and hold to raise the Vehicle on the Lift.
• Safety Lock Release Handle: Located on the Power Post above the Power Unit, it
disengages the Safety Locks so you can lower the Lift.
• Lowering Handle: Lowers the Lift when used at the same time as the Safety Lock Release
Handle. Located on the Power Unit.
• Power Disconnect Switch: Immediately interrupts main electrical power to the Lift. Used for
electrical circuit faults, emergency situations, or when Lift is undergoing service or maintenance.
• Lift Heads: Sometimes called carriages. Lift Heads move up and down in the Posts. They
connect to the Lift Arms, so when the Lift Heads move up, the Lift Arms also move up, thus raising
any Vehicle on the Lift Arms.
• Lift Arms: Extendable steel arms that attach to the Lift Heads. Adapters (also called Pads) attach
at the end of each Lift Arm; they contact the Lifting Points on the underside of the Vehicle.
• Adapters: Pads that contact the Lifting Points on the underside of the Vehicles you raise. Four
Screw Lift Adapters are included with your Lift, as are a set of four Auxiliary Adapters that can be
used with the Screw Lift Adapters to add an additional 2.5 inches of height (to make better contact
with the Lifting Points on some Vehicles).
Frame Cradle Pads, which are well-suited for raising and holding trucks and SUVs (body-on-frame
style), are available separately.
• Safety Locks: Hold the Lift Heads up when engaged. Multiple Safety Lock heights let you select
the best one for your needs. Once engaged on its Safety Locks, the Lift Heads stay up, even if the
Lift loses power.
Only leave your Lift fully lowered or engaged on Safety Locks.
Safety Locks are pretty well hidden by the Posts, but you can hear them as the Lift rises. Refer to
About Safety Locks for more information.
• Overhead Assembly: The steel beam that sits between the tops of the two Posts, it supports
the Lift’s structure, holds Cables and Hydraulic Lines, and can be set to Wide or Narrow drive-
through Configurations during installation.
• Safety Shutoff Bar: Located on the underside of the Overhead Assembly, the Safety Shutoff
Bar stops upward movement of the Lift if the top of a Vehicle hits it.
• Equalizing Cables: Two cables that keep the Lift Heads synchronized. You do not want one Lift
Head lowering or raising faster than the other Lift Head; the Equalizing Cables keep them
synchronized. For Symmetric Lifts, the two Equalizing Cables are the same length; for Asymmetric
Lifts, the two Equalizing Cables are different lengths.

 Loading...