16 17
EXIT
SET UP
LANGUAGE
CHECK
SET UP
CHANGE
EXIT
SET UP
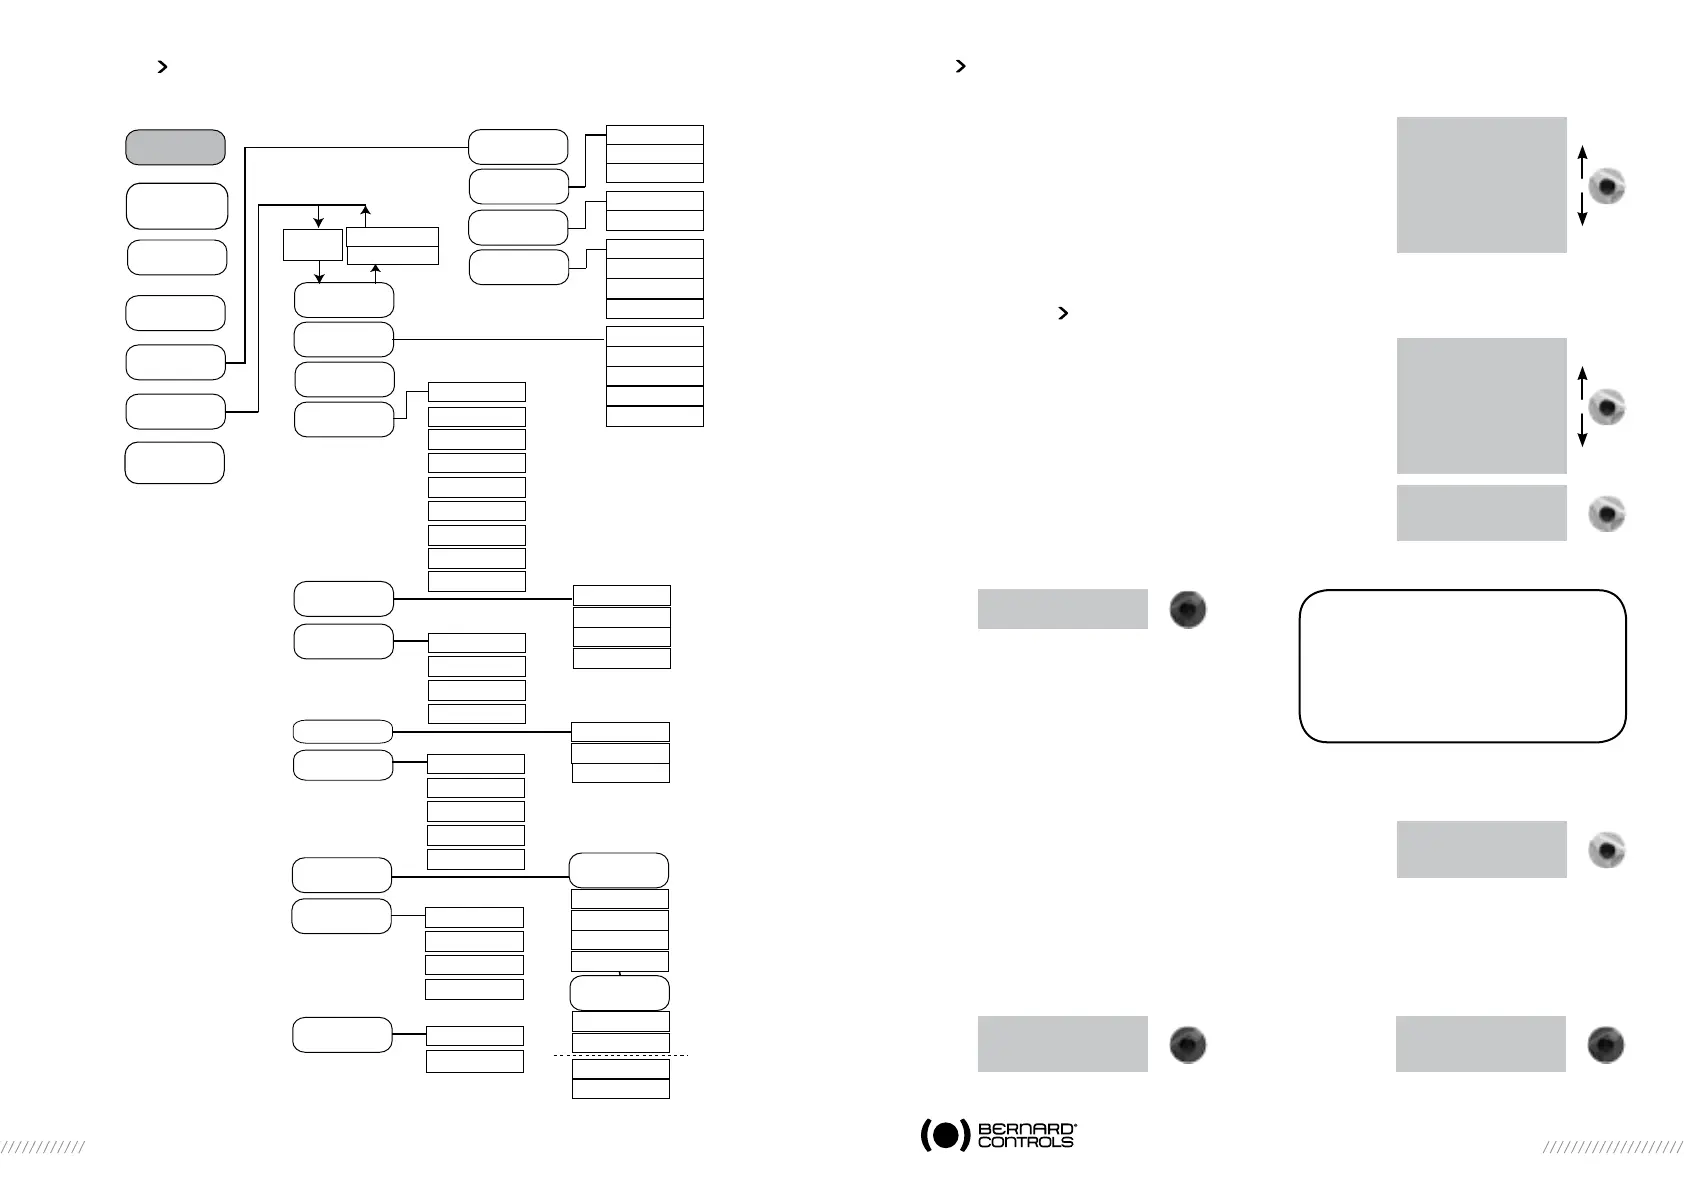
MENU
RETURN
ACTIVITY
COMMANDS
return
aux. command 1
aux. command 2
local command
local stop
remote stop
priority
fault tolerance ESD
partial stroke
return
number of starts
running time
starts last 12h
handwheel action
TORQUE
return
torque setting
measured torque
closing mode
DATA
SHEET
return
valve tag number
entry code
characteristics
POSITION
return
close direction
opt position signal
POSITIONER
return
signal range
dead band %
lost signal
proportional pulse
SIGNALING
return
opposite display
torque displayed
lights
LOCAL
INDICATION
return
relay 1
relay 7
fault relay
REMOTE
INDICATION
TIMER
return
timer open time
timer close time
temporised zone
FIELDBUS
return
according to
interface bus
CLOSING MODE
CLOSE
DIRECTION
POSITION
SETTING
on (position)
on (torque)
on (torque) O/C
(CW)
(CCW)
return
valve closed?
valve open?
automatic
RETURN
(change ok?)
(no change)
user
code
BLUETOOTH
13 SET UP AND ChANGE MENU FLOWChART
14
ADJUSTING AN ACTUACTOR ON A VALVE
The SET UP menu is used to set the open and closed positions
when the actuator has been
installed on the valve. Settings can be made manually by choosing
the open and closed positions, or automatically. In automatic
mode, the actuator rotates and halts at the end positions in response
to the torque limiter. INTELLI+ then determines the stop
positions. Set up manually if you want to avoid having the
actuator stop in response to the torque limiter or if you want
to choose the stop positions yourself.
14.1 MANUAL SET UP
Select set up in the MENU and turn to OK to confirm.
Select closing mode in the SET UP menu and turn to OK to confirm.
Select whether valve to close on basis of torque or position
(both open and close actions can also be set on torque).
Select OK to confirm.
Select close direction and turn to OK to confirm.
Indicate normal close direction (generally clockwise).
Select OK to confirm.
Select position setting and turn to OK to confirm.
Select valve closed ? to make closure setting Turn to OK to
confirm. When (no) is displayed, turn to OK to confirm. The display shows:
Set the valve in the closed position either with
the handwheel or using the motor control. Use the
same closing mode as previously, i.e. close to the
torque limiter for torque-type closure and without
torque limiter activation for position-type closure
When the valve is in the correct position perform local stop to return to the menu. When (yes) is
displayed, turn to OK to confirm. If any doubt about the setting, select (no) and start again
Position ok is displayed. Turn to OK to continue. Now set the valve open position.
When valve open ? is displayed turn to OK to confirm.
When (no) is displayed turn to OK to confirm. The display shows:
Set the valve in the closed position either with the handwheel or using the motor control. Ensure
that there is no possibility that the actuator will reach the mechanical stop.
When the valve is in the correct position, perform local stop to return to the menu.
When (yes) is displayed turn to OK to confirm. If in doubt about the setting, select (no) and start
again Position ok is displayed. Turn to OK to continue. The display shows the stroke (in degres for
SQX, in turns or mm for STX) at the end of the set up process.
or
Turn to OK to confirm and return to control mode.
SET UP
return
closing mode
closing direction
position setting
return
POSITION SETTING
return
valve closed?
valve open?
automatic
return
close by button
return = local stop
0°
return = local stop
position ok
ok
measured stroke
90°
Note: At this stage of the set up
operation, the selectors used to navigate
through the menu become active for
performing actuator control functions
again. The knob has to be held until the
required position is obtained. The self-hold
capability is not active during set up.
measured stroke
37 turns
 Loading...