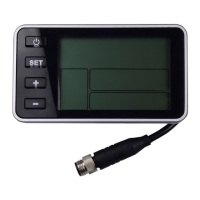
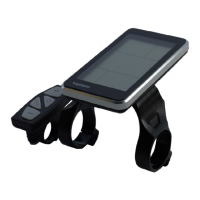
The C500B-LCD is a display unit designed for e-bikes, providing a range of functions and indicators to enhance the user's riding experience. Manufactured by Nanjing Bigstone Electronic & Technology co.,Ltd, this product is made of black ABS material with a nylon bracket, ensuring normal usage and good mechanical performance within a temperature range of -20 to 60°C.
Function Description
The C500B-LCD serves as a central interface for monitoring and controlling various aspects of an e-bike. Its primary functions include:
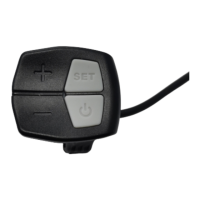
- ON/OFF Control: Allows users to power on and off the display, which in turn provides power to the controller. Holding the ON/OFF button also activates or deactivates the backlight.
- Current Display: Shows the discharging current of the controller, with each mark representing 2A, and six segments indicating >=12A.
- Speed Display: Presents the current riding speed, with the option to select between KM/H and MPH units.
- Backlight Indicator: Illuminates the display for better visibility, controlled by a click of the ON/OFF button. If the e-bike has a headlight, the controller will simultaneously turn the headlight on/off with the backlight (this function may not be available by default).
- 6KM/H Work (Walk Assist): A feature that allows the e-bike to move at a steady 6 km/h, activated by holding the DOWN button for 2 seconds. Releasing the button disengages this mode.
- PAS Selection (Power Assist System): Enables or disables the power assist system by holding the UP button for 2 seconds.
- PAS Level Selection: Users can adjust the power assist level by clicking the UP or DOWN buttons. The default mode is level 9, with an output power range from level 1 to level 9. The default value is level 0.
- Error Code Indicator: In case of an electronic control system malfunction, the display will flash at 1 Hz and show an error code, helping users identify and troubleshoot issues. The e-bike will not operate until the problem is resolved.
- User Setting Operation (SET): Provides access to a general project setting interface where various parameters can be configured. This is accessed by holding the SET button for 3 seconds. Users can cycle through settings (SET1 to SET7) by clicking SET, adjust parameters with UP or DOWN, and exit by holding SET for 6 seconds.
- Distance Indicator: Displays accumulated mileage (ODO) and trip mileage (Trip).
- Trip Time Indicator: Shows the duration of the current ride.
- Battery Indicator: Provides information about the battery, including residual capacity (represented by five segments, each 20%) and current voltage. A flashing battery frame indicates a severely low battery.
- Mobile Phone Charging Indicator: An icon that lights up when the USB charging function is active, activated by pressing UP and SET for 2 seconds.
- Auto Sleep: The display automatically enters sleep mode if the speed is 0 km/h for 5 minutes, conserving battery.
Important Technical Specifications
While specific numerical values for all technical specifications are not explicitly detailed for every feature, the manual highlights several key parameters and their adjustable ranges:
- Max Speed Setting (SET2): The default maximum speed is 99.9 km/h. Users can modify this value between 20 km/h and 99.9 km/h. Setting it to 99.9 km/h effectively removes the speed limit. When the riding speed exceeds the set value, the controller stops supplying power to the e-bike for safety.
- Wheel Diameter Setting (SET3): Allows for the selection of an accurate wheel diameter value to ensure precise speed and mileage readings.
- KM/H & MPH Selection (SET4): Enables switching between metric and imperial units for speed and mileage display.
- Voltage Choice (SET5): Supports selection between 36V and 48V systems.
- Current Limit Setting (SET7): Allows users to set the current limit.
- Motor Characteristic Parameter Setting (P1): This parameter is defined as "motor gear" and is calculated as "reduction ratio × number of rotor magnet pieces," rounded to the nearest whole number.
- Wheel Speed Pulse Signal Setting (P2): Configures the number of pulse signals generated by the wheel per revolution (e.g., 1 for 1 pulse, 6 for 6 pulses).
- Power Assist Control Mode Setting (P3): Determines the power assist mode, with P3=1 for "imitation torque control" (gear 9) and P3=0 for "speed control" (gear 9). The setting depends on the controller's distributed function.
- Handlebar Startup Setting (P4): Configures whether the handlebar operates under "non-zero startup" (requires foot power assist first, P4=1) or "zero startup" (motor can be started directly by handlebar, P4=0).
- Handlebar Function Setting (P5): Offers a setting range of 0-4 for handlebar functions, with different behaviors depending on the P4 setting.
- Handlebar Speed Setting (P6): Allows selection of the handle speed limit to ensure it does not exceed the top speed at the current handle level.
- Power-Assist Sensor and Parameter Select Setting (C1): Defines various power-assist sensor parameters, including sensitivity and signal type (Reverse 5 Signal, Forward 5 Signal, Reverse 6 Signal, Forward 6 Signal, Reverse 8 Signal, Forward 8 Signal, Reverse 10 Signal, Forward 10 Signal, Reverse 12 Signal, Forward 12 Signal).
- Gear Mode Setting (C2): Sets the maximum gear level (e.g., 3 for max gear 3, 6 for max gear 6).
- Power Assist Ratio Gear Initialization Setting (C3): Sets the initial power assist ratio gear when the meter is powered on (e.g., 1 for gear 1, 5 for gear 5).
- Motor Operating Temperature Display (C4): Displays the motor's operating temperature, requiring a temperature sensor in the inner motor.
- Meter Attribute Display (C5): A display of meter attributes.
- ABS Brakes of the Controller Setting (C6): Configures the ABS brakes of the controller, with a default value of 0 and a setting range of 0-5.
- Power-assist Tuning Parameters Setting (C7): Adjusts power-assist tuning parameters, with a default value of 1 and a setting range of 0-2.
Usage Features
The C500B-LCD is designed for intuitive use with its four-button interface: ON/OFF, SET, UP, and DOWN.
- Simple Power Control: A single press of ON/OFF starts the display and powers the controller. A 2-second press turns off the power.
- Backlight Control: Clicking ON/OFF toggles the backlight on and off.
- Assist Level Adjustment: UP and DOWN buttons allow for quick changes to the power assist levels.
- Walk Assist: Holding DOWN for 2 seconds activates the 6 km/h walk assist feature, useful for maneuvering the e-bike on foot.
- PAS System Activation: Holding UP for 2 seconds enables or disables the Power Assist System.
- Comprehensive Settings: The SET button provides access to a detailed settings menu, allowing users to customize various operational parameters of the e-bike, such as speed limits, wheel diameter, and power assist characteristics.
- Distance Tracking: The display shows both total accumulated distance (ODO) and resettable trip distance (Trip), with the Trip distance automatically resetting after shutdown or manually in the SET1 interface (or automatically if it reaches >=500km).
- Battery Monitoring: Clear indication of battery capacity and voltage helps users manage their rides and plan recharges.
- USB Charging: The ability to charge mobile phones via USB (activated by pressing UP and SET for 2 seconds) adds convenience for riders.
Maintenance Features
The manual provides guidance on common problems and solutions, as well as warranty information, contributing to the device's maintainability.
- Error Code Diagnosis: The error code indicator is a crucial maintenance feature, automatically flashing a code (0-9) when a system fault occurs. This allows for quick identification of issues such as current errors, throttle errors, motor phase position problems, Hall errors, brake errors, undervoltage, motor stalling, and communication errors between the controller and display. The e-bike will not run until the problem is fixed.
- Troubleshooting Guide: The "Common Problems & Solutions" section addresses basic issues like the display not starting (check connector) and how to deal with error codes (fix the problem or visit a repair shop).
- Quality & Warranty:
- Warranty Period: The warranty period for the display is 18 months from the date of purchase.
- Warranty Scope: Quality problems arising from normal use are covered.
- Exclusions: The warranty does not cover:
- Demolished products.
- Damage caused by incorrect installation or operation.
- Broken shell when the display leaves the factory.
- Broken wires.
- Damage due to force majeure (e.g., fire, earthquake, natural disasters, lightning).
- Products beyond the warranty period.
The C500B-LCD is a user-friendly and feature-rich display designed to provide e-bike riders with essential information and control over their vehicle's performance and settings, while also offering basic diagnostic and maintenance support.