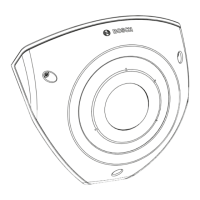
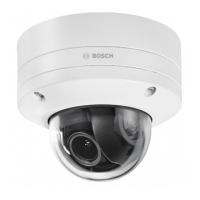
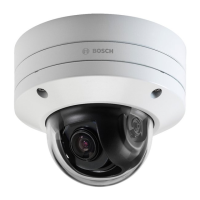
The FLEXIDOME corner 7100i IR, identified by models NCE-7703-FK and NCE-7703-FK-GOV, is a professional IP video surveillance camera designed for corner mounting. It features a discreet and vandal-resistant design, incorporating an anti-ligature (no-grip) characteristic, making it suitable for environments where such considerations are paramount. The camera is engineered to provide a detailed and comprehensive overview of any room, effectively eliminating blind spots. Its advanced smart invisible IR technology ensures consistent image quality even in conditions of complete darkness or very low light. This is further enhanced by HDR (High Dynamic Range) technology, which, when combined with the powerful smart IR illumination, allows the camera to capture highly detailed images even in the most challenging lighting scenarios.
The FLEXIDOME corner 7100i IR is intended for integration into professional IP video surveillance solutions. Its installation, commissioning, and operation are restricted to trained professionals to ensure proper setup and adherence to safety and performance standards. The use of surveillance cameras, including this device, is subject to national laws and regulations, and users are expected to operate the camera accordingly.
Preparation for installation involves careful unpacking and verification of all included parts. The camera comes with a corner mount box, face plate, IR cover, a TR20 Allen key for installation, an RJ-45 punch-through aid, M20 rubber grommets, MAC address labels, a Quick Installation Guide, and a safety and security information manual. Before installation, it is crucial to ensure all components are present and undamaged. The installation process requires the PoE cable to be pre-installed, with appropriate cable length determined based on the distance to the local connection point, avoiding excessively long cables. To guarantee the IK10+ standard, specific screws and mounting plugs are necessary, with different quantities specified for installations with or without a conduit box. An appropriate power drill, screwdriver with a TR20 bit holder, and an optional micro SD card (industrial SD cards with health monitoring are recommended by Bosch) are also required.
A notable feature of this camera is its "in-box configuration" capability. This allows for pre-configuration of settings and firmware upgrades directly from the box, without the need to fully unpack the camera. It provides direct access to an RJ45 connector, enhancing efficiency and ease of setup by enabling off-site configuration.
The installation process involves several steps, starting with installing the back cover plate. This plate serves as a template for marking and drilling screw holes on the wall. The RJ-45 cable is pulled through, and the screws are tightened. Bosch recommends specific dimensions for wall screws to ensure secure mounting. Next, the cable grommets are installed to prevent water or dust ingress. This involves removing a protrusion, using an RJ-45 punch-through aid to pull the Ethernet cable through, inserting the punch-through aid onto the Ethernet cable, and finally pulling the cable through the grommet. It is important to use the cable entry marked with PoE for the RJ45/PoE cable to ensure a watertight installation.
Installing the camera module involves routing the appropriate cables for power, video, alarms, and audio through one of the access holes, pulling back any excess cable, and then placing the camera cover onto the camera base in the correct orientation. The camera base is then slightly pressed onto the mounting plate until a click is heard or felt, ensuring it is secured. It is crucial to confirm that the lens module marking "TOP" is facing up to ensure images appear correctly in the system or browser. Red arrows on both parts aid in proper orientation. The IR cover and front face plate are then installed by aligning the IR connectors and red triangles, placing the IR cover on the camera module, and tightening the screws using the supplied TR20 Allen key. Finally, any protective foil is removed from the IR cover, and the face plate is aligned with the Bosch logo on top before tightening its screws.
The camera includes an LED status indicator located on the camera top, above the lens. This LED provides visual feedback on the camera's operational status. A solid red LED indicates booting, while a flashing red LED signifies resetting. A solid green LED means the camera is working, but the stream is not being watched or recorded. A flashing green LED indicates that the stream is being watched and/or recorded. The status LED can be disabled in the camera settings via the "Camera" and "Installer menu" options.
Connection to the camera is typically established via a web browser such as Google Chrome, Microsoft Edge, or Mozilla Firefox. The camera allows for live image viewing, unit control, and replay of stored sequences. System requirements include a computer with a dual-core HyperThreading processor or better, a graphic card matching or exceeding the camera's resolution, Windows 10 or later, and network access. Application software like Video Security Client or BVMS can also be used. The camera is pre-set with DHCP enabled, allowing a DHCP server to assign an IP address. If no DHCP server is present, a link-local address is automatically assigned. The Project Assistant app or Configuration Manager (version 7.60 or higher) can be used to find the IP address. For initial installation, any security questions that appear must be confirmed. If a RADIUS server is used for network access control, the device must be configured before network communication. Direct connection to a computer via a network cable can be used to set the service-level password. The camera supports up to 50 web browser connections or up to 100 connections via BVMS.
The device is password-protected, requiring a strong password to be set upon the first access. The system provides prompts and measures password strength. After setting the initial password, a "lock" icon appears next to the device name in Configuration Manager. The device webpage also displays an initial password page with input fields and a password strength gauge. New software releases may require setting a new and stronger password.
Troubleshooting guidance is provided to identify and correct malfunctions. Common issues include the unit not operating (possible causes: power failure, faulty cable connections, incorrect unit configuration, faulty installation), no connection or image transmission (possible causes: wrong IP address, faulty data transmission, maximum connections reached), and the unit not being operational after a firmware upload (possible causes: power failure during programming, incorrect firmware file). The ping command can be used to test network connectivity. If a fault cannot be resolved, users are advised to contact their supplier, system integrator, or Bosch Security Systems Customer Service, providing firmware version numbers accessible via the browser's address bar.
Maintenance features focus on lens cleaning to ensure optimum performance. Dust, grease, or fingerprints should be removed carefully to avoid damaging the special coating. Recommended methods include using a blower-brush or grease-free soft brush, wiping water drops with a clean soft lint-free cloth, and using special lens cleaning paper or cloth treated with lens cleaning fluid, wiping spirally from the lens center towards the edge. The unit does not contain any user-serviceable parts, and all repairs should be referred to qualified specialists. A reset button is available to restore the unit to its original factory settings by pushing it for 10 seconds, which can be useful if invalid settings prevent desired functionality.
For decommissioning, the device should be transferred along with its Installation Manual. Disposal of the product and/or battery must be done separately from household waste, following local laws and regulations to allow for reuse and recycling, thereby conserving resources and protecting human health and the environment.