Do you have a question about the Bowflex Treadmill 22 and is the answer not in the manual?
Proper grounding procedure for 120V AC systems to prevent electric shock.
Proper earthing procedure for 220-240V AC systems to prevent electric shock.
Connect uprights to the base and route cables.
Secure the crossbar and pivot shrouds to the main frame.
Mount the console base and connect associated cables.
Install upright supports and tighten all hardware.
Thread cables through the console mast and attach it to the frame.
Connect console cables and secure the console assembly.
Install side handlebars and connect their respective cables.
Connect upper handlebar cables and insert handlebars.
Mount base shrouds and outer junction covers onto the frame.
Install the inner junction covers onto the frame.
Mount the crossbar tray onto the frame assembly.
Secure the console rear cover to the frame assembly.
Connect the power cord and safety key to the machine.
Steps for setting up the console, including Wi-Fi connection and user registration.
Controls on handlebars to adjust incline and speed.
Enabling the machine to receive signals from a Bluetooth® HR monitor.
Instructions for using the included Bluetooth® Heart Rate Armband.
How to use the handlebars' integrated heart rate sensors.
Steps to begin using the machine, including safety checks and power connection.
Instructions for adjusting the walking deck incline during a workout.
How to adjust the walking belt speed during a workout.
Procedures for pausing, resuming, or ending a workout.
Steps for safely powering off and restarting the treadmill.
Procedure for adjusting belt tension to prevent slipping.
Procedure for centering the walking belt on the treadmill.
Steps to diagnose and resolve issues with the unit not powering on.
Troubleshooting steps when speed or incline adjustments fail.
Diagnosing problems with Bluetooth® HR monitor display.
Resolving issues with inaccurate speed display readings.
Troubleshooting fan operation issues.
Steps to fix unit rocking or leveling problems.
Addressing thumping sounds from the walking belt.
Steps to resolve issues with the walking belt being misaligned.
Diagnosing and resolving strained motor sounds.
Troubleshooting belt hesitation or slipping during use.
Resolving issues where the belt stops moving during operation.
Details of what the warranty covers, including frame and motor.
Specific warranty periods for different parts of the machine.
Nautilus's process for handling warranty claims and repairs.
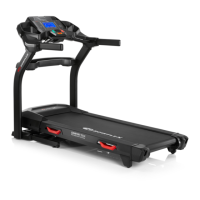
| Motor | 4.0 CHP |
|---|---|
| Running Surface | 22" x 60" |
| Incline | -5% to 20% |
| Weight Capacity | 400 lbs |
| Display | 22" HD Touchscreen |
| Speed | 0 to 12 mph |
| Connectivity | Bluetooth |
| Heart Rate Monitoring | Bluetooth |
| Warranty | 15 year frame, 5 year parts, 2 year labor |