Assembly Guide
11
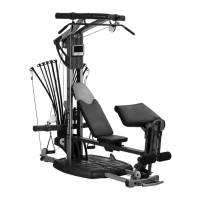
Step 11: Attach the Lat Cross Bar to the Upper Lat Tower
Locate the following items:
• Upper Lat Tower (Item #2)
• Lat Cross Bar (Item #3)
• (2) 3/8" X 2 1/2" Button Head Screws (Item #E)
• (2) 3/8" Washers (Item #K)
Align the two holes on the Lat Cross Bar (Item #3) with those on
the Upper Lat Tower (Item #2). Be certain to face the Cross Bar
Hooks away from the Tower (see Figure M).
Place (2) 3/8" Washers (K) over the end of (2) 3/8" X 2 1/2"
Button Head Screws (E) - one washer per screw. With the screws
and washers, tightly secure the Lat Cross Bar to the Upper
Lat Tower.
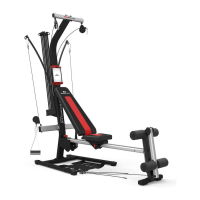
Step 12: Attach Upper Lat Tower to the Lower Assembly
Locate the following items:
• Upper Lat Tower Assembly (from Step 11)
• Main Assembly (from Step 10)
• (6) 3/8" X 3/4" Button Head Screws (Item #B)
• (6) 3/8" Washers (Item #K)
Position the Upper Lat Tower Assembly over the Main Assembly
as shown in Figure N.
Insert the base of the Upper Lat Tower into the top of the Main
Assembly. Align all six holes and secure using (6) 3/8" X 3/4"
Button Head Screws (B) and (6) 3/8" Washers (K).
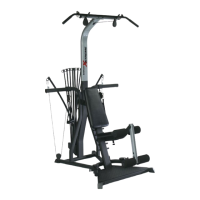
Step 13: Unwrap the Cables and Tighten Assembly
Connect and route each of the pulley Cables through the pulleys
as illustrated to confirm that the cables can move freely. Note that
each exercise has its own pulley configuration - see Page 13 for
more specific pulley setup information.
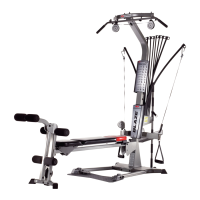
Carefully go over the entire Bowflex Xtreme assembly, and
tighten all screws, nuts and other hardware before using your
Bowflex Xtreme.
Figure N
K
B
2
Figure O
Figure M
E
K
3
2
CONGRATULATIONS! Your Bowflex
®
Xtreme
TM
is ready to give you an Xtreme Workout!