7
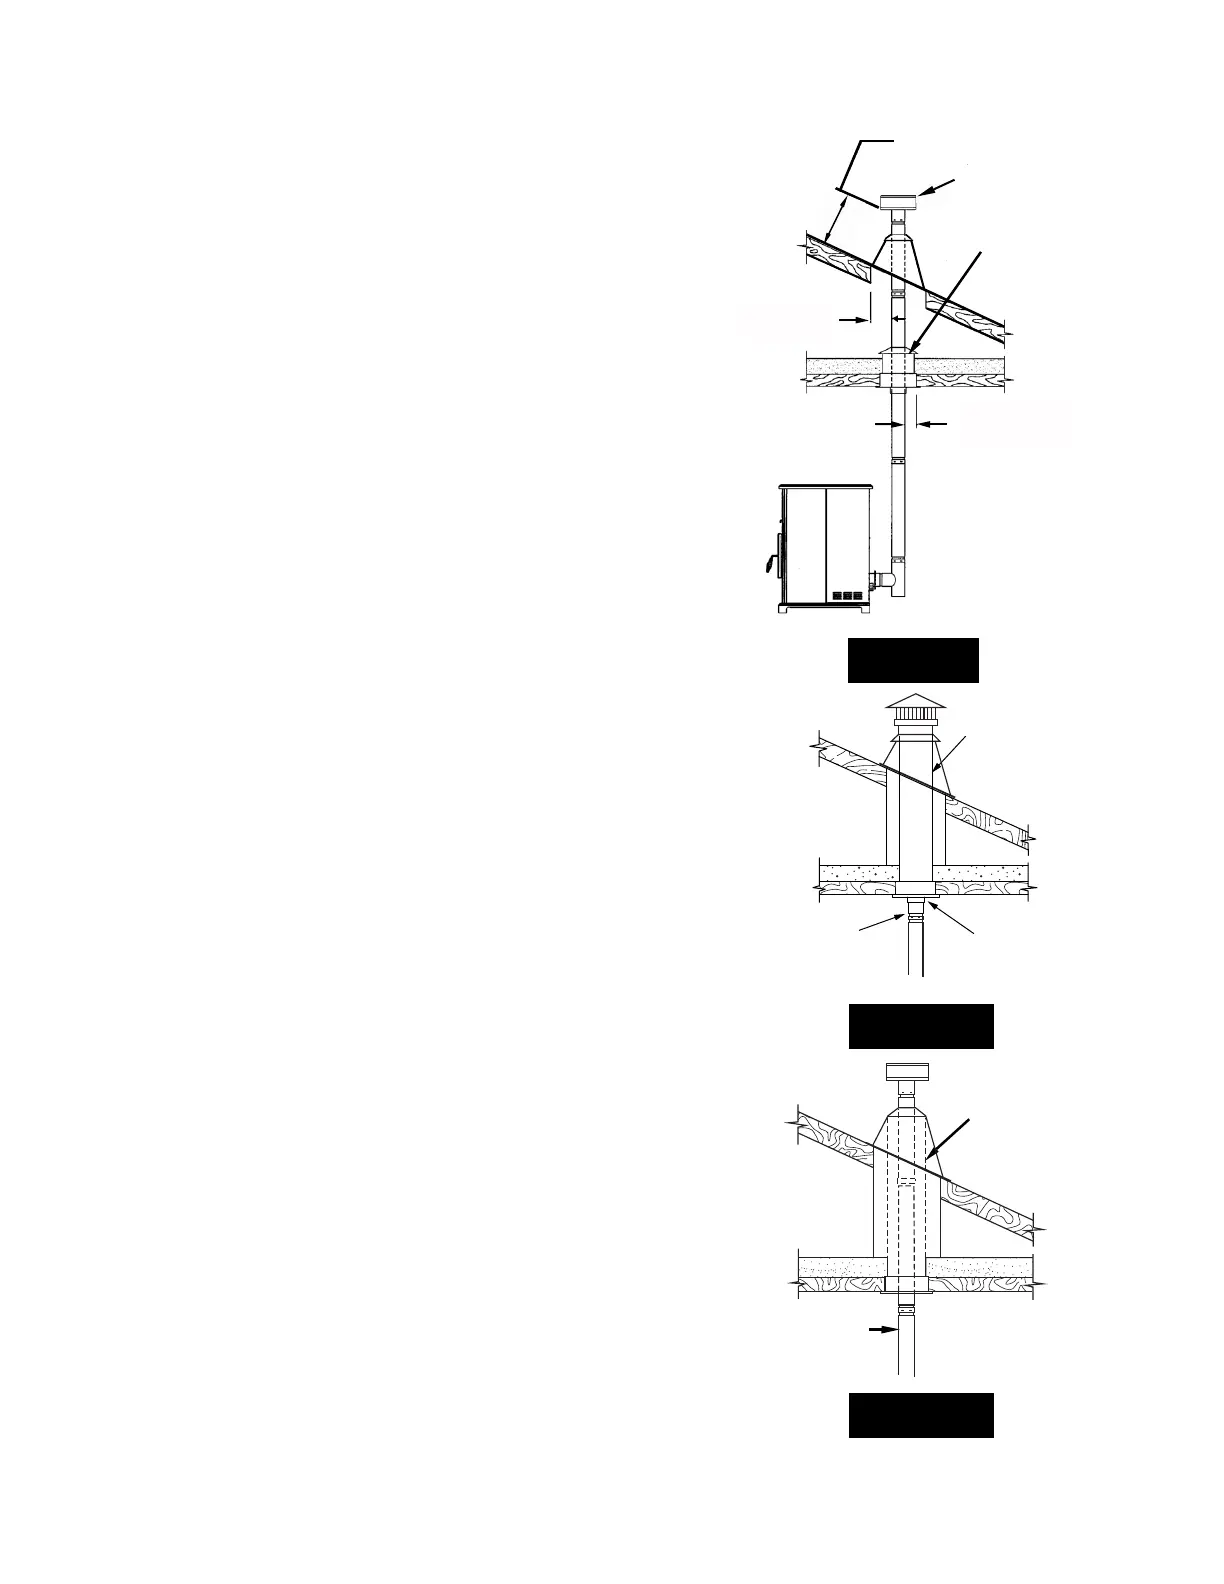
B. VERTICALLY WITH NEW CHIMNEY SYSTEM (Refer to Figure 6)
NOTE: Follow L-Vent chimney manufacturer’s instructions.
OPTION: To achieve a center vertical installation, a 45o elbow and
a clean-out tee can be used to offset the pipe from the exhaust
outlet to the rear center of the stove.
OPTION: Install L-Vent elbow in place of clean-out tee. Locate
stove. Drop plumb bob to center of tee outlet , mark point on ceiling.
Install ceiling support and L-Vent pipe per L-Vent manufacturer’s
instructions.
1. Always maintain 3” clearance from combustible materials.
When passing through additional oors or ceilings, always install
restop spacer.
2. After lining up for hole in roof, cut either a round or square hole
in roof, always 3” larger all the way around pipe. Install upper
edge and sides of ashing under roong materials, nail to the
roof along upper edge. Do not nail lower edge. Seal nail heads
with non-hardening waterproof mastic.
3. Apply non-hardening, waterproof mastic where the storm collar
will meet the vent and ashing. Slide storm collar down until it sits
on the ashing. Seal and install cap. Mobile home installations
must use a spark arrester.
C. VERTICALLY INTO EXISTING CHIMNEY SYSTEM
Adapters are available to adapt from 3” L-Vent to 6” or 8” Class-A
chimney. (Figure 7)
As an alternative, 3” or 4” L-Vent can be run inside existing chimney
to termination. (Figure 8)
This is the preferred method.
Follow guidelines for equivalent vent length.
D. VERTICALLY INTO EXISTING MASONRY FIREPLACE
NOTE: Follow L-Vent chimney manufacturer’s instructions.
1. Have the masonry chimney inspected by a qualied chimney
sweep or installer to determine its structural condition.
2. You will need a pipe length equal to the chimney height from
the hearth. If outside combustion air is to be used, you will need
a pipe length equal to the chimney height plus 18 inches.
3. Install a blanking plate and the chimney pipe, and if used the
outside air pipe, as shown in Figure 9
4. Attach the L-Vent adapter, a section of pipe and clean-out
tee, making sure the clean-out tee is centered in the chimney
ue area. Use RTV, metallic tape, and a minimum of three self-
taping screw at all joint connections to ensure a tight seal.
5. Position the stove, adhering to the clearances in Figure 1.
6. Measure and build chimney top plate. Cut out holes for chimney
pipe, and if used the outside air pipe. Install and seal with non-
hardening mastic to prevent water leakage. Install vent cap.
FIGURE 6
FIGURE 7
FIGURE 8
12” MINIMUM CLEARANCE
TO ROOF
VERTICAL ROOF VENT
ATTIC
INSULATION
SHIELD
3” MINUMUM
CLEARANCES TO
COMBUSTIBLES
3” MINUMUM
CLEARANCES TO
COMBUSTIBLES
PELLET VENT TO
CHIMNEY ADAPTER
(SPV-CA)
UNIVERSAL
CONNECTOR
PELLET
VENT
NOTE:
THIS METHOD
IS PREFERRED
EXISTING
CHIMNEY
SYSTEM
EXISTING
CHIMNEY
SYSTEM
Installation