9
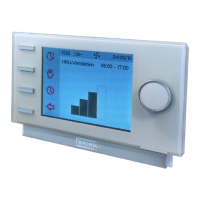
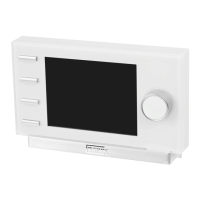
The Brink Brink Air Control should be placed at a
KHLJKWRIDSSUR[LPDWHO\PHWHUVDERYHWKHÀRRU
The Brink Brink Air Control may not be covered, for
example, by a curtain or a cabinet;
Consult paragraph 1.2 for environmental
requirements.
2.3 During use
Take note! Settings, which have not been described
in this user’s manual, are intended for installers appro-
ved by Brink Climate Systems. Do not change these
by yourself.
2.4 During maintenance
Careful! Clean the screen with a soft cloth.
Careful! Never apply water and/or (cleaning) liquid to
the screen.
2.5 For the environment
Take note! The Brink Air Control may not be remo-
ved as unsorted urban waste, but should be treated
separately.
Take note! Make enquiries within your own region,
where the Brink Air Control can be handed in when
use has been terminated. Do not throw away electrical
devices or parts, but check if (parts of) the Brink Air
Control cannot be handed in, recycled or re-used.
3 Assembly and installation (to be performed
by the installer)
Assembly and installation should be performed by an installer
approved by Brink Climate Systems.
3.1 Assembly
You should perform the steps, described in paragraph 3.1.1
through paragraph 3.1.4, one by one, to assemble the Brink
Air Control.
3.1.1 Disconnecting the operational module from the wall
bracket
Disconnect the operational module from the wall bracket.
Perform the following actions
4
:
6OLGHWKHFRQWUROXQLWXSZDUGRYHUWKHWZRJXLGHSUR¿OHV
of the wall bracket until the control unit can be taken off.
3.1.2 Electrical connection
The following actions should be performed to connect the
Brink Air Control electrically (see
5
):
Feed the two-core wire (from the device to be connected)
through via opening at the back of the wall bracket.
Check that the cables’ ends have been stripped in the
correct manner. If this is not the case, do so.
Screw the cable to the terminal No. 1 and No. 2. Consult
the installation instructions of the device to be connected,
for more information on the correct connection.
3.1.3 Mounting the wall bracket
The wall bracket can be attached to a wall box (Ø 55 mm) or
can be directly mounted on the wall with screws and plugs.
Screw the wall bracket onto the wall in the correct posi-
tion. Here one must use the mounting holes in the wall
bracket (see
6
).
Take note! Consult paragraph 2.2 for more informa-
tion on placing the Brink Air Control.
3.1.4
Replacing the operational module in the wall bracket
Place the operational in the wall bracket mounted on the wall.
Perform the following actions for this (see
7
):
Slide the control unit downward over the two guide pro-
¿OHV0DNHVXUHWKHJXLGHSUR¿OHVRIWKHZDOOEUDFNHW¿W
snugly in the cutouts of the control unit provided for that
purpose.
Take note! The operational module should click onto
the wall bracket. Only then is a proper electrical con-
nection established.
3.2 Installation
3.2.1 Setting language
You can set the language in which the menus are presented.
Perform the following actions to set the language(see
1
, 9
&
12 ):
Press return
2
as many times as necessary to get to the
main screen
Press
1
. ‘Main Menu’ opens
Select ‘Basic Settings’ by turning
1
Press
1
. ‘Basic Settings’ opens
Select ‘Language’ by turning
1
Press
1
. ‘Language’ opens
Select the desired language by turning
1
Press
1
to set the selected language
Press return
2
as many times as necessary to get to the
main screen
Take note! The names of the described menu items
will not correspond with this user manual’s menu items
if the Brink Air Control is set to a language other than
Dutch.
3.2.2 Setting time
You can set the time. The time is visible on the main screen
The Brink Air Control only has 24 hour representation. Perform
the following actions to set the time (see
1
):
Press return
2
as many times as necessary to get to the
main screen
Press
1
. ‘Main Menu’ opens
Select ‘Basic Settings’ by turning
1
Press
1
. ‘Basic Settings’ opens
Select ‘Clock’ by turning
1
Press
1
. ‘Clock’ opens
Change the time by turning
1
Press
1
WRFRQ¿UPWKHWLPH
Repeat the previous two steps for both the minutes and
seconds
Press return
2
as many times as necessary to get to the
main screen
 Loading...