10
3.2.3 Setting date
You can set the date. The date is visible on the main screen.
Perform the following actions to set the date(see
1
,
9
&
12 ):
Press return
2
as many times as necessary to get to the
main screen
Press
1
. ‘Main Menu’ opens
Select ‘Basic Settings’ by turning
1
Press
1
. ‘Basic Settings’ opens
Select ‘Date’ by turning
1
Press
1
. ‘Date’ opens
Change the day by turning
Press
1
WRFRQ¿UPWKHGD\
Repeat the previous two steps for both the months and
the year
Press return
2
as many times as necessary to get to the
main screen
3.2.4 Selecting a device connected to the Brink Air
Control
You can choose the device you want to regulate with the
control if multiple devices are connected to Brink Air Control.
Proceed as follows to set the appliance selection (see
1
&
13 ):
Press return
2
as many times as necessary to get to the
main screen
Press
1
. ‘Main Menu’ opens
Select ‘Installer’ by turning
1
Press
1
. ‘Installer’ opens
Select ‘device’ by turning
1
Press
1
WRFRQ¿UPVHOHFWHGGHYLFH
If only one appliance is connected, no choice is offered and
only HRU appliance is displayed.
4 Description of operation: manner of use
You can increase or decrease the ventilation mode with the
Brink Air Control. You can do this by setting a program. You
can temporarily override the program while it is running.
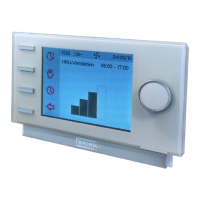
4.1 Navigation: general description
Navigating through menus
The Brink Air Control has menus that you can navigate
through. For this you use navigation button
1
(see
1
). You
scroll through the menus by turning the navigation button
1
(see
9 B). You can open a selected menu-item by pressing the
navigation button(see
9 A).
Return to the main screen
The main screen (see
2
) is the Brink Air Control’s start screen.
You can always return to the main screen by pressing on the
info button
2
(see
1
) a few times. The number of times you
need to press return depends on how deep you have gone
into the menu. U need not be afraid of pressing return too
frequently.
4.2. Selecting a device connected to the Brink Air
Control
You can choose the device you want to regulate with the con-
trol if multiple devices are connected to Brink Air Control. See
§ 3.2.4.
4.3 Weekly programmes: P1, P2 and P3
You can programme the regulation of the ventilation mode in
a weekly program. You can choose from programs P1, P2 and
P3.
Program P1
With this you create a day program for every day of the week.
Program P2
With this you create two day programs. One day program
for weekdays ‘mo-fri’ and one day program for the weekend
‘sa-su’.
Program P3
With this you create seven day programs. Separately for every
day of the week.
4.3.1 Standard settings P1, P2 and P3
The Brink Air Control has standard set weekly programmes.
<RXFDQ¿QGWKHVHVHWWLQJVLQDSSHQGL[
4.3.2 Creating a P1 program (see
1
)
Press return
2
as many times as necessary to get to the
main screen
Press
3
.‘Setting & activating timer programme’ opens
Select ‘P1: week’ by turning
1
Press
1
, ‘P1: week’ opens
You have a choice from ‘Period 1’, ‘Period 2’, ‘Period 3’, ‘Period
4’, ‘Period 5’ and ‘Period 6’. Every period is a part of the day in
which you can set a ventilation position.
Perform the following actions to set period 1:
Select ‘Period 1’ by turning
1
Press
1
, ‘Period 1’ opens
Select ‘Start Time’ by turning
1
Press
1
, ‘Start time’ opens
Change the start time by turning
1
You have a range of between 3.00u and 2.59u
If in a period the time is turned back so far that lines
appear, that period and the one above it will be deleted.
Press
1
WRFRQ¿UPWKHVWDUWWLPH
Now set the ventilation mode for period 1.
Perform the following actions for this:
Select ‘Ventilatiestand’ by turning
1
Press
1
, ‘Ventilatiestand’ opens
Set the ventilation mode for period 1 by turning
1
Press
1
WRFRQ¿UPWKHYHQWLODWLRQPRGHIRUSHULRG
You have set the ventilation mode for period 1 You can set
period 2 through 6 in the same manner. A period ends when a
new one starts.
4.3.3 Creating a P2 program (see
1
)
Press return
2
as many times as necessary to get to the
main screen
Press
3
.‘Setting & activating timer programme’ opens
Select ‘P2: week/weekend’ by turning
1
Press
1
, ‘P2: week/weekend’ opens
 Loading...