12
The manual position now overrules the programme. Press re-
turn
2
if you wish to undo the manual position. Return button
2
can not be operated until some 10 seconds after the latest
setting!
4.7 Setting ventilation mode’s values
You can set a ventilation mode’s value by yourself.
Perform the following actions for this (see
1
& 13 ):
Press return
2
as many times as necessary to get to the
main screen
Press
1
. ‘Main Menu’ opens
Select ‘Installer’ by turning
1
Press
1
. ‘Installer’ opens
Turn
1
to select the desired appliance
1
Press
1
WRFRQ¿UPWKHGHVLUHGDSSOLDQFHRUVHOHFWWKH
choice HRV appliance if only one appliance is connected)
Select ‘Device settings’ by turning
1
Press
1
. ‘Device settings’ opens
6HOHFWµ$LUÀRZ+ROLGD\¶E\WXUQLQJ
1
Take note!
µ$LUÀRZ+ROLGD\¶UHIHUVWRYHQWLODWLRQPRGH
.
µ$LUÀRZ
Reduced
)’ refers to ventilation mode .
µ$LUÀRZ1RUPDO¶UHIHUVWRYHQWLODWLRQPRGH
.
µ$LUÀRZ+LJK¶UHIHUVWRYHQWLODWLRQPRGH
.
6HW$LUÀRZ+ROLGD\E\WXUQLQJ
1
Press
1
WRFRQ¿UPWKHVHWYDOXHIRU$LUÀRZ+ROLGD\
You can set debit 1 through 3 in the same manner as descri-
EHGDERYHIRU$LUÀRZ+ROLGD\
Take note! You cannot feed in a value, lower than
YDOXHRIDORZHU$LUÀRZSRVLWLRQIRUDKLJKHU$LUÀRZ
+ROLGD\$LUÀRZ5HGXFHG$LUÀRZ1RUPDO$LUÀRZ
High).
4.8 Retrieving settings
You can retrieve the current settings from the Brink Air Control.
Press return
2
as many times as necessary to get to the
main screen
Press
1
. ‘Main Menu’ opens
Turn
1
to select the desired appliance
Press
1
WRFRQ¿UPWKHGHVLUHGDSSOLDQFHRUVHOHFWWKH
choice HRV appliance if only one appliance is connected)
Select ‘Device information’ by turning
1
Press
1
. ‘Device information’ opens
Turn
1
to display the desired information
Take note! You can look at, but not change, the set-
tings via the info menu.
4.9 Factory settings connected device
A device has been connected to the Brink Air Control. It is
possible to set back all this device’s settings to the factory set-
tings. Perform the following actions for this (see
1
):
Press return
2
as many times as necessary to get to the
main screen
Press
1
. ‘Main Menu’ opens
Select ‘Installation Settings’ by turning
1
Select ‘Installer’ by turning
1
Press
1
. ‘Installer’ opens
Select ‘Factory setting’ by turning
1
Press
1
. ‘Factory setting’ opens
Turn
1
to select the option ‘yes’
Press
1
WRFRQ¿UPUHVWRULQJWKHIDFWRU\VHWWLQJ
The settings are put back to the factory settings.
Selecting factory setting will restore all step numbers to
the original factory setting. All fault messages will be de-
leted as well
5 Maintenance
5.1 General maintenance
Careful! Clean the screen with a soft cloth.
Careful! Never apply water and/or (cleaning) liquid to
the screen.
&OHDQLQJRUUHSODFLQJ¿OWHU
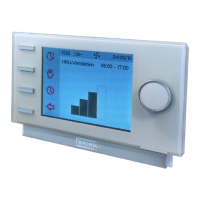
)LOWHUQRWL¿FDWLRQ
7KH¿OWHUV LQWKHGHYLFHFRQQHFWHGWRWKH %ULQN$LU &RQWURO
should be cleaned or replaced when the text ‘FILTER’ appears
on the Brink Air Control’s display (see
8
).
5HPRYLQJFOHDQLQJRUUHSODFLQJ¿OWHUV
Consult the manual of the device connected to the Brink Air
&RQWUROIRUUHPRYLQJ¿OWHUV
5HVHWWLQJ¿OWHUQRWL¿FDWLRQ
<RXFDQUHVHWWKH¿OWHUQRWL¿FDWLRQDIWHU\RXKDYHFOHDQHGRU
UHSODFHGWKH¿OWHURUWKH¿OWHUV)RUWKLV\RXSUHVVWKHUHWXUQ
button
1
IRUDWOHDVW¿YHVHFRQGVVHH
1
& 10 ).
Press return
2
to get to the main screen.
7KHWH[W¿OWHURQWKH%ULQN$LU&RQWURO¶VGLVSOD\GLVDSSHDUV
6 Dismantling
Warning! You are not permitted to dismantle the Brink
Air Control or parts of the Brink Air Control by yourself.
This may only be done by a maintenance mechanic
approved by Brink Climate Systems.
7 Repair
Warning! You are not permitted to open or repair the
Brink Air Control or parts of the Brink Air Control by
yourself. This may only be done by a maintenance
mechanic approved by Brink Climate Systems.
 Loading...