LCD (liquid crystal display) operation 15
1
— — — — — — — — — — — — — — — — — — — — — — — — — — — — — — — — — — — — — — — — — — — — — — — — — — — —
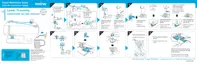
Checking machine operating
procedures
Displays simple explanations of setting upper thread /
bobbin winding / setting bobbin thread / needle
replacement / embroidery unit attachment /
embroidery frame attachment / embroidery foot
attachment / presser foot replacement on the LCD.
a
Turn on the sewing machine.
X The LCD comes on.
b
Press (Sewing machine help key) on the
display panel.
X The sewing machine help screen appears.
c
Press the item to be displayed.
a Threading the upper thread
b Winding the bobbin
c Installing the bobbin
d Needle replacement
e Embroidery unit attachment
f Embroidery frame attachment
g embroidery foot attachment
h Replacing the presser foot
X The first screen describing the procedure for
the selected topic appears.
• Pressing (Back key), returns you to the
item selection screen.
d
Press (Next page key) to switch to the
next page.
If you press (Previous page key), you return
to the previous page.
Example: Upper threading
e
After you finish looking, press (Back key)
two times.
X The initial stitch screen appears again.
Note
z For details on each topic, refer to the
corresponding page in this Operation
Manual.
1
2
3
4
5
67
8

 Loading...