General Description
POWERplus User Guide 1.1.0 4 350-00104-4
General Considerations
A 100 W radio requires about 20A of current and for best performance the voltage at the radio should be
about 13.8 V. The use of 10AWG wire is recommended to minimize the voltage drop in the cable.
All cables should be terminated at the POWERplus with Anderson Powerpole connectors. The use of 40A
contacts is recommended for applications that are using the full 40A capability of POWERplus. Remember
that a 100W station uses at least 20A.
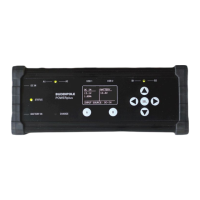
• Connect the input cables to the appropriate Powerpole connectors on the left side of the unit.
Use the Red/Black connectors for the DC input port and the Blue/Black for the (optional) battery
input.
• Connect the output cables to the Powerpole connectors located on the long edge of the
POWERplus enclosure. There are four DC outputs arranged in two groups, each with two output
ports.
Refer to the OPERATIONS section for information on how to setup current limiting for each
group of outputs.
• In addition to the 12V outputs there are also two USB charger ports. These can be used to
charge a cell phone or tablet with a maximum current of 1.5A each.
Settings
Recommended initial settings for a POWERplus with external battery.
Details of how to changes these settings are provided in the OPERATIONS section.
ENABLE if battery is connected, disable if you
are not using an external battery.
Select ENABLE to have display
shut off after a period of time
or OFF to have display always
active.