14
Setting up the player
Selecting the best output resolution
For the latest generation of 1080p, "Full HD" or "True HD" TV displays, the
best output resolution will naturally be 1080p. For earlier "HD Ready" digital
televisions this might be 720p or 1080i. It is usually best to set the output
of the CXU to the native resolution of the TV, consult the TVs manual for
details of the actual resolution of its panel. Large TVs are often 1080p (1920
x 1080) but smaller TVs are sometimes 720p (1280 x 720). These are general
recommendations that work for most users, but there can be exceptions.
Advanced users may want to try all supported resolutions and choose the
one that provides the best visual result.
The CXU also supports a special "Source Direct" output mode via its HDMI
output. This mode is recommended for use with external video processors or
high-end TVs with high quality scalers. In "Source Direct" mode, the player
works as a "transport". It decodes video from the discs and then sends the
raw video signal in its native resolution and format, without extra processing,
to the external video processor or TV. The actual output resolution thus varies
by content:
Content Source direct output resolution
PAL DVD 576i
NTSC DVD 480i
4VZ[)S\YH`4V]PLZÄSTZV\YJL W /aVYW/a
Most Blu-ray TV shows or Concerts 1080i
(video-source)
SACD and DVD-Audio 1080p
For both HDMI outputs, the following output resolutions are available: 4Kx2K,
Auto, 1080p, 1080i, 720p, 480p/576p, 480i/576i, and Source Direct.
If 'Auto' is selected, the player will determine the output resolution based on
the best signal resolution that the TV can display. It does this by reading the
EDID of the TV via the HDMI connection, if all is well the TV will tell the CXU
the range of video outputs it can support and the CXU will pick the highest
one. The CXU will then always scale the output to this resolution.
If any of the other resolutions is selected the CXU will always scale the output
to the resolution you select.
Note: 4Kx2K is a new standard and only a handful of TVs currently support
this. For most TV selecting this option will cause the picture to be lost.
To change the output resolution, press the Res button on the remote to bring
up the 'Resolution' menu, then press the or buttons on the remote to
OPNOSPNO[ [OL KLZPYLK V\[W\[ WYLZZ [OL ,U[LY I\[[VU [V JVUÄYT HUK YL[\YU
If your TV does not support the selected resolution, you may see a black
ZJYLLUVY HU LYYVY TLZZHNL 0U[OPZJHZL[Y`HKPɈLYLU[YLZVS\[PVU[OH[`V\Y
TV can support.
Note: In case you are not able to get a picture using the HDMI outputs, please
connect the player to the TV using the diagnostic composite video output,
and then use the Setup menu to adjust the player settings.
Operating instructions
Getting started
;\YU VU [OL WV^LY VM [OL *?< ;= HTWSPÄLY(= YLJLP]LY HUK HU` V[OLY
components which are connected to the CXU. Make sure the TV and the
audio receiver are set to the correct input channel.
1. Press the Open/Close button to open the disc tray.
2. Place the disc on the tray, label side facing up.
3. The player will read the disc information and start playback.
4. Depending on the content of the disc, a menu or navigation screen may
appear. Please use the Navigation and Enter button to select the
content to play.
5. To stop playback, press the button.
;V[\YUVɈ[OLWSH`LYWYLZZ[OL:[HUKI`6UI\[[VU
Note:
+\YPUN+=+HUKZVTL)S\YH`+PZJWSH`IHJRWYLZZPUN[OL button for the
ÄYZ[[PTL IYPUNZ[OLWSH`LY[VHWYLZ[VWTVKL@V\JHUYLZ\TLWSH`IHJR
from the stopped point by pressing the / button. This pre-stop mode
allows you to change the player settings and then resume playback. To
completely stop playback, press the button twice.
*LY[HPU)S\YH`+PZJZ^P[O)+1H]H[LJOUVSVN`KVUV[Z\WWVY[[OLWYLZ[VW
mode. Pressing the button during playback of such discs will completely
stop the disc. Pressing the /button once the disc is stopped will restart
it from the very beginning.
;OPZ \UP[ MLH[\YLK HU LU]PYVUTLU[HSS` MYPLUKS` SV^WV^LY #> Z[HUKI`
circuit. If it is not to be used for a long time, unplug it from the household
AC outlet.
+VUV[W\[HU`[OPUNL_JLW[H )++=+*+ ZPaLKKPZJPU[V[OL[YH`MVYLPNU
objects may damage the mechanism.
+VUV[MVYJL[OL[YH`I`OHUKK\YPUN[OLVWLUPUNHUKJSVZPUNVWLYH[PVUZ
;V H]VPK KPY[ HUKK\Z[LU[LYPUN [OL TLJOHUPZT RLLW[OLKPZJ [YH` JSVZLK
when not in use.
0M[OLKPZJPZZLYPV\ZS`ZJYH[JOLKVY[VVKPY[`[OLWSH`LYTH`UV[ILHISL[V
read it or play it.
5L]LYSVHKTVYL[OHUVULKPZJPU[V[OLKPZJ[YH`H[VUL[PTL
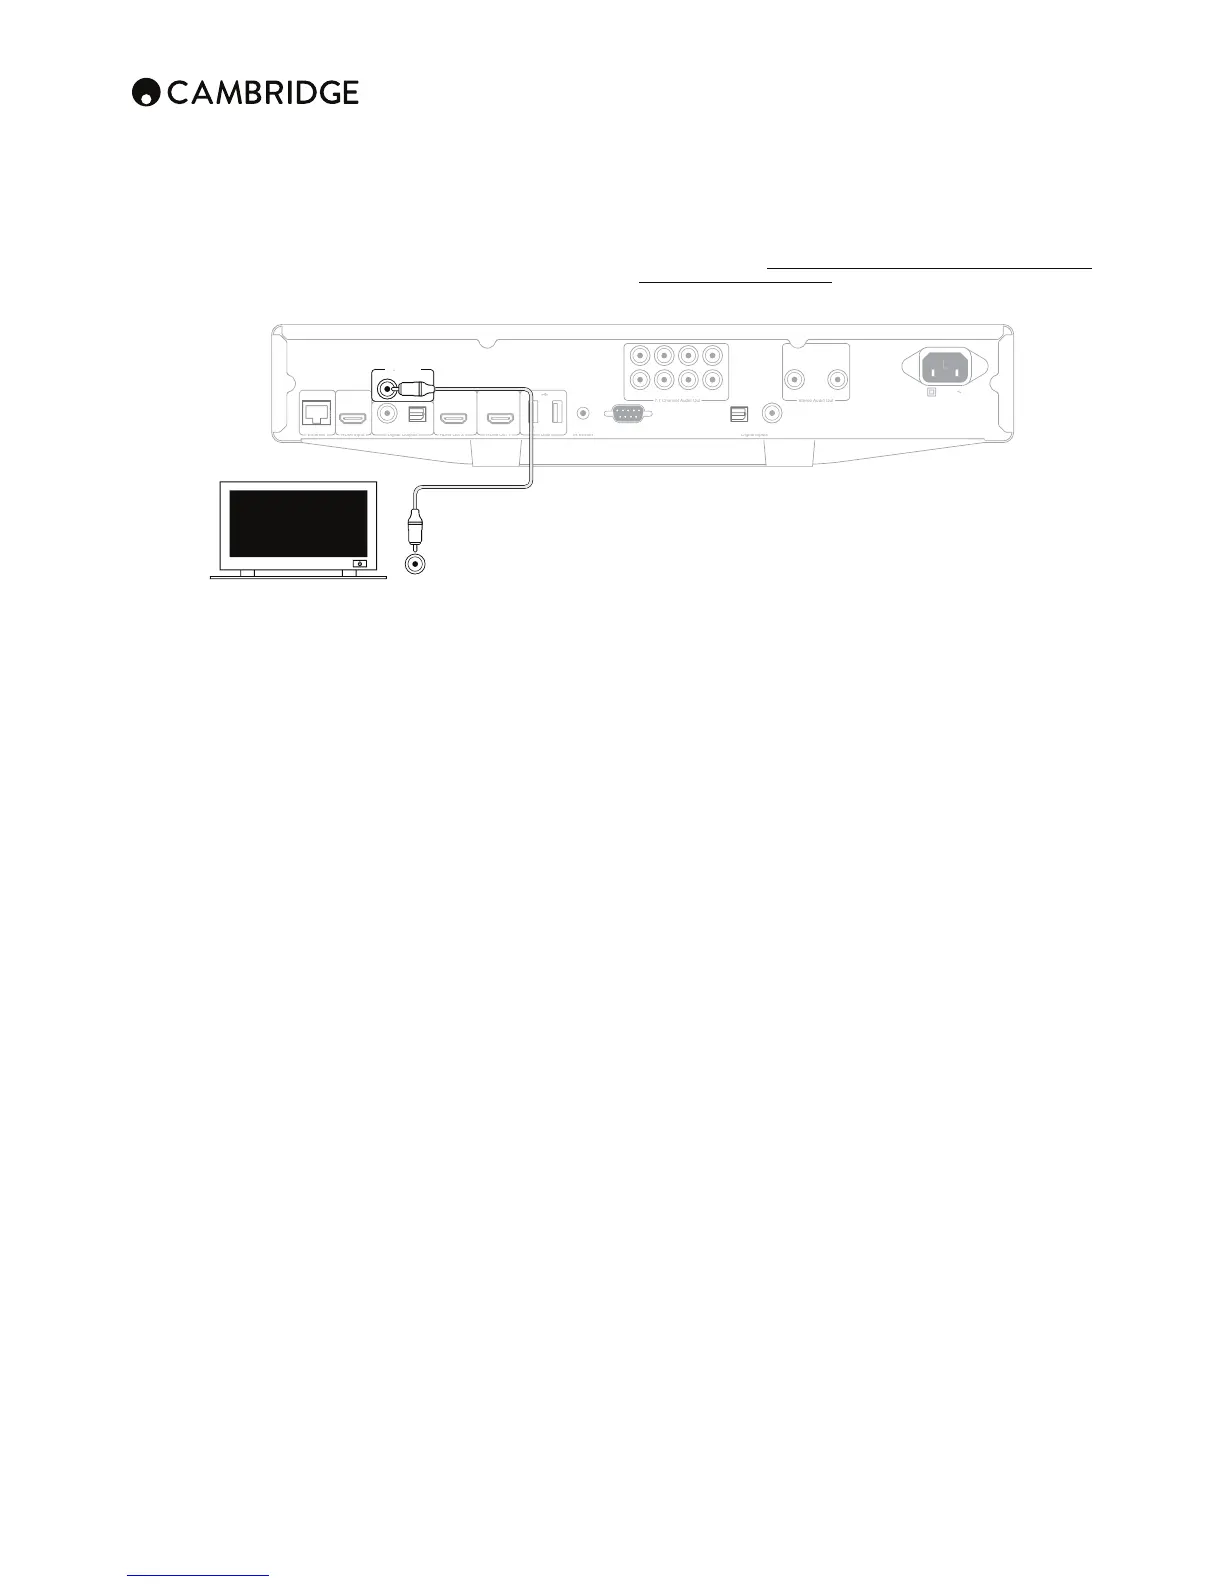
Diagnostic video output
The CXU features a composite (CVBS) diagnostic video output. Optionally
you can connect this to your TV as well as making a HDMI connection. This
output can be useful if you lose the HDMI output (perhaps by selecting an
output type your TV cannot display).
L
BL
Ri
t Lef
R
B
oax
S-232
O
tica
oax
omposite
O
tical
Power AC
Diagnostic Video
Composite
The diagnostic video output will still work and can be used to display the OSD
and change settings. Only the OSD is shown via the diagnostic video output
it is not used for video playback.
In