T--298
3-12
3.6.4 Condenser Motor Removal
To remove condenser fan motor, do the following:
a. Perform steps outlined in Section 3.6.2.
b. Remove (3) 13MM bolts (See Figure 3-31).
c. Remove (3) Grommets. Inspect, replace or reuse.
d. Cut Tie--Wraps & discard (2 locations). When re-
assembling, tie--wrap at same 2 locations.
e. Remove ground wire from compressor bracket (See
Figure 3-33).
f. Un--plug (yellow/brown/white) from control box as-
sembly.
g. Reverse above procedure for reassembly.
Cond. Motor
Ground Screw
Comp. Mounting Bolt
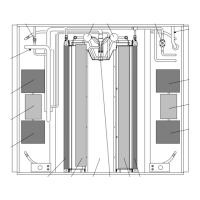
Figure 3 -33 Condenser Motor Ground
3.6.5 Evaporator Motor/Blower Assembly
Removal
To remove the evaporator motor, do the following:
a. Perform steps outlined in Section 3.6.2.
b. Pull back on and release the (4) locking tabs. There
are 2 on each side of the control box assembly. (See
Figure 3-34).
c. Lift control box assembly fromlower scroll assembly,
exposing evaporator motor.
d. Un--plug (black/blue/white/brown) evaporator motor
from control box assembly.
e. Remove ground wire (green/yellow) from motor
housing.
f. Lift motor/blower assembly from lower scroll assem-
bly cradle.
g. Carefullyremove theblower wheelfrom theevapora-
tor motor shaft by pushing out from the motor side.
Blower Side Locking Tabs
Outside Locking Tabs
Figure 3 -34 Evaporator Motor Locking Tabs
Cradle
Lower Scroll
Assembly
Capacitor
Figure 3-35 Evaporator Motor/Blower Assembly
In Cradle
 Loading...