The MagicQ Compact Series Consoles are a range of lighting control devices, including models MQ40, MQ40N, MQ60, and MQ70, designed for professional use in lighting setups. These consoles are primarily used for controlling and programming lighting fixtures, offering a comprehensive suite of features for live shows, theatrical productions, and other events requiring sophisticated lighting control.
Function Description
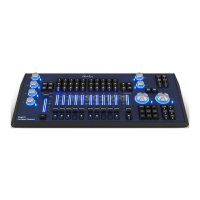
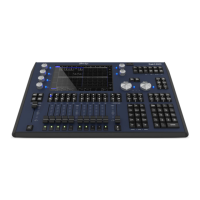
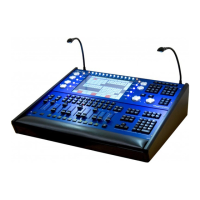
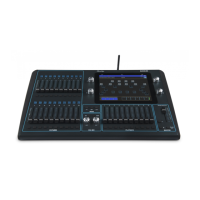
The MagicQ Compact consoles provide a robust platform for managing complex lighting designs. They feature a combination of physical faders, encoder knobs, and a touchscreen interface for intuitive control. The consoles are capable of storing and recalling cues, stacks, and macros, allowing users to build intricate lighting sequences. They support a wide range of DMX-compatible fixtures and can be integrated into larger lighting networks via Ethernet. The programming interface includes dedicated buttons for common functions such as group selection, intensity control, position, color, and beam adjustments, streamlining the workflow for lighting designers. The consoles also incorporate a programmer section for real-time adjustments and a playback section for executing pre-programmed shows.
Important Technical Specifications
While specific detailed technical specifications like processor speed or memory capacity are not explicitly provided in the manual excerpts, the console's design implies a powerful internal architecture capable of handling real-time DMX output and complex show data. Key operational specifications mentioned include:
- Power: The console operates on 240V AC, with a critical warning to disconnect mains power before any maintenance.
- Connectivity: Features include MIDI In/Out, USB ports (for memory sticks and external keyboards), and a network switch for Ethernet connectivity (supporting protocols like ArtNet).
- Display: The consoles utilize a combined display/touch assembly, with a ChamSys part number 410-102 for replacement.
- Internal Components: The console houses a main PCB board, a hard drive, a power supply, and a UPS battery.
- Software: The consoles run MagicQ software, with updates available from the ChamSys website. The software installer uses a
.cdc extension.
- Backup System: The console automatically stores archive show files every 15 minutes and daily, with daily files overwritten every 7 days.
Usage Features
The MagicQ Compact consoles are designed for ease of use and flexibility in a live environment.
- Intuitive Control Layout: The physical layout includes 12 faders, 2 large high-resolution encoders, and 6 smaller low-resolution encoders, along with numerous dedicated buttons for quick access to functions.
- Programmer Section: This section allows for real-time control and adjustment of lighting parameters, with buttons for "REL," "SEL," "CLEAR," "UNDO," "REMOVE," "MOVE," "COPY," "SET," "INC," "UPDATE," and "RECORD."
- Playback Section: Features "PAGE," "CUE STACK," "PLAY CUE," "BACK STORE," and "TLINE" buttons for managing and executing show sequences.
- Head Control: Dedicated buttons for "NEXT HEAD," "PREV HEAD," "LOCATE," "ODD," "EVEN," "HIGH LIGHT," "SINGLE," "FAN," and "ALL" facilitate efficient control of individual or groups of lighting fixtures.
- Parameter Control: Buttons for "GROUP," "INT," "FX," "THRU," "POS," "COLOR," and "BEAM" allow for precise manipulation of various lighting attributes.
- External Keyboard Support: The console can be controlled via an external keyboard, offering shortcuts for functions like resetting the front panel (CTRL 9), resetting the MagicQ application (CTRL 0), and shutting down the console (CTRL BREAK).
- Software Upgrades: The console software can be easily upgraded via a USB memory stick, ensuring access to the latest features and bug fixes.
- Fault Finding: The manual provides guidance on diagnosing common issues such as "No Outputs" and "Desk Not Responding," offering troubleshooting steps like checking fader positions, playback activity, DMX I/O settings, and network configurations.
Maintenance Features
Maintenance of the MagicQ Compact consoles is designed to be performed by experienced and qualified personnel, with specific tools and procedures outlined.
- Safety First: A critical warning emphasizes disconnecting 240V AC mains power before any maintenance.
- Tools Required: Specific tools include a 5.5mm nut driver for PCB spacers, 2mm and 1mm tip pozidrive screwdrivers, and a small flat-headed screwdriver for encoder knobs.
- Disassembly:
- Front Panel Removal: Involves removing 12 fader knobs (pull off), 2 large encoder knobs (loosen screws with a flat-head screwdriver), and 6 M4 x 6mm Pozi head screws from the underside of the console.
- Console Opening: The console opens by lifting the top panel, but not more than 45 degrees to prevent damage to the battery connector.
- Battery Disconnection: The battery must be disconnected from the main PCB to fully open the console.
- Extrusion Removal: 10 M3 x 5mm counter-sunk screws on the metal extrusions need to be removed, followed by gently pulling the side extrusions away and down. The front extrusion can then be lifted away.
- PCB Access: After removing extrusions, 3 PCB spacers (using a 5.5mm nut driver) and 11 M3 Pozi head screws from the back of the PCB (excluding the 4 around the LCD screen) are removed to access the main PCB.
- Component Replacement:
- Screen Replacement: Involves disconnecting the touch screen connector (push-fit) and the LCD backlight connector, then removing 4 M3 Pozi head screws around the screen. The ribbon connector must be carefully detached.
- Key Caps: Can be levered off with two flat-head screwdrivers and new ones pressed on.
- Faders: Require desoldering six solder joints, removing the old fader, and soldering in a new one (ChamSys part no: 308-002). High-quality lead-free solder is recommended.
- Key Switches: Involve desoldering LED connections (if present) and switch connections, removing the old switch, and soldering in a new one (ChamSys part no: 307-001). LED orientation must be noted.
- Flash Switches: Similar to key switches, requiring desoldering LED and switch connections, and soldering in a new one (ChamSys part no: 307-003).
- Troubleshooting Screen Problems: For intermittent screen faults (white/RGB vertical lines), the manual suggests disassembling the console, cleaning the screen connector with isopropyl alcohol and a fine brush, and reassembling. If the fault persists, contacting ChamSys UK is advised.
- Reporting Problems: Users are encouraged to send show files and log files to support@chamsys.co.uk for investigation and resolution of issues. Log files contain diagnostic information about key presses, strange events, and resets.
- Resetting the Console:
- Soft Reset: Hold SHIFT while quitting the MagicQ application.
- External Keyboard Reset: Press CTRL BREAK on an external keyboard for unresponsive consoles.
- Hard Reset: Press and hold the reset button for 5 seconds.
- Full Power Off: Disconnect mains power and hold the reset button for approximately 15 seconds.