4-3
Cisco Aironet 1200 Series Access Point Hardware Installation Guide
OL-8370-04
Chapter 4 Upgrading the 2.4-GHz Radio
Opening the Access Cover
Opening the Access Cover
To open the 2.4-GHz radio access cover, follow these steps:
Step 1 Remove all cables and power connections from the access point.
Step 2 Remove all static-generating items from the work area, such as plastic material, styrofoam cups, and
other similar items.
Step 3 Place the access point and the new 2.4-GHz radio (in its antistatic bag) on an antistatic work surface.
Step 4 Discharge any static buildup on your body by touching a grounded surface (antistatic work surface)
before proceeding.
Step 5 Position the access point so that the bottom cover is facing up.
Caution The internal access point components and the 2.4-GHz radio can be damaged by ESD from improper
handling.
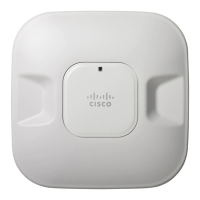
Step 6 Remove the bottom access cover using the T-10 tamper-resistant Torx L-wrench provided with your
Cisco radio card (see Figure 4-1).
Figure 4-1 Location of 2.4-GHz Radio Access Cover Screw
If your access point was not configured with a 2.4-GHz radio, go to the “Removing a Blank Spacer Card”
section. If you are replacing an existing 2.4-GHz radio, go to the “Removing a 2.4-GHz Radio” section.
1 Access Cover Screw
 Loading...