Draft 1A - CISCO CONFIDENTIAL
2-5
Cisco Aironet 1240AG Series Access Point Hardware Installation Guide
OL-7293-01
Chapter 2 Installing the Access Point
Installation Summary
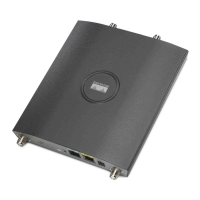
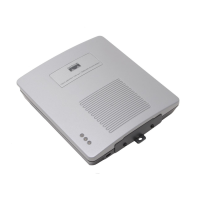
Figure 2-2 illustrates the 5-GHz connector end of the access point.
Figure 2-2 Access Point 5-GHz Connector End
Installation Summary
While installing the access point, you will perform these operations:
• Mount the mounting plate on a convenient flat horizontal or vertical surface, such as a desktop, book
shelf, file cabinet, wall, ceiling, or suspended ceiling T-rail. See these sections:
–
“Mounting on a Horizontal or Vertical Surface” section on page 2-7
–
“Mounting Below a Suspended Ceiling” section on page 2-8
–
“Mounting Above a Suspended Ceiling” section on page 2-9
–
“Mounting Access Point on a Desktop or Shelf” section on page 2-11).
• Attach the access point to the mounting plate (see the “Attaching the Access Point to the Mounting
Plate” section on page 2-16).
• Secure the access point (see the “Mounting Below a Suspended Ceiling” section on page 2-8).
• Connect Ethernet and power cables (see the “Connecting the Ethernet and Power Cables” section on
page 2-12).
• Configure basic settings (refer to Chapter 3, “Configuring the Access Point for the First Time”).
• Configure security and other access point options (refer to the Cisco IOS Software Configuration
Guide for Cisco Aironet Access Points).
1 Security key slot 3 5-GHz antenna connector (right/primary)
2 5-GHz antenna connector (left)
 Loading...