Disassembly
Removing the Hard Disk Drive 2 - 9
2.Disassembly
Removing the Hard Disk Drive
Note that Models using a 48WH battery will not have a hard disk installed.
The hard disk drive can be taken out to accommodate other 2.5" serial (SATA) hard disk drives with a height of 7.0mm
(h). Follow your operating system’s installation instructions, and install all necessary drivers and utilities (as outlined in
Chapter 4 of the User’s Manual) when setting up a new hard disk.
Hard Disk Upgrade Process
1. Turn off the computer, and remove the battery (page 2 - 5).
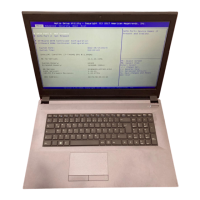
2. The HDD will be visible at point on the mainboard (Figure 5a
).
3. Remove screws
from the HDD assembly. Slightly lift and disconnect the hard disk assembly from the connec-
tor
(Figure 5b).
4. Lift the hard disk assembly out of the bay (Figure 5c).
Figure 5
HDD Assembly
Removal
a. Locate the HDD.
b. Remove the screws and
disconnect the HDD
from the connector.
c. Lift the HDD assembly
out of the bay.
4. HDD Assembly
•1 Screw
Powering the
Computer On
After every disassem-
bly, make sure that the
bottom case’s screws
are all inserted and
tightened before open-
ing the Lid/LCD and
turning the computer
on.
 Loading...