FIGURE 22 Connect good earth ground to AP
1. Earth ground screw
Congratulaons! You ha
ve mounted your T750SE access point.
Powering the AP with AC
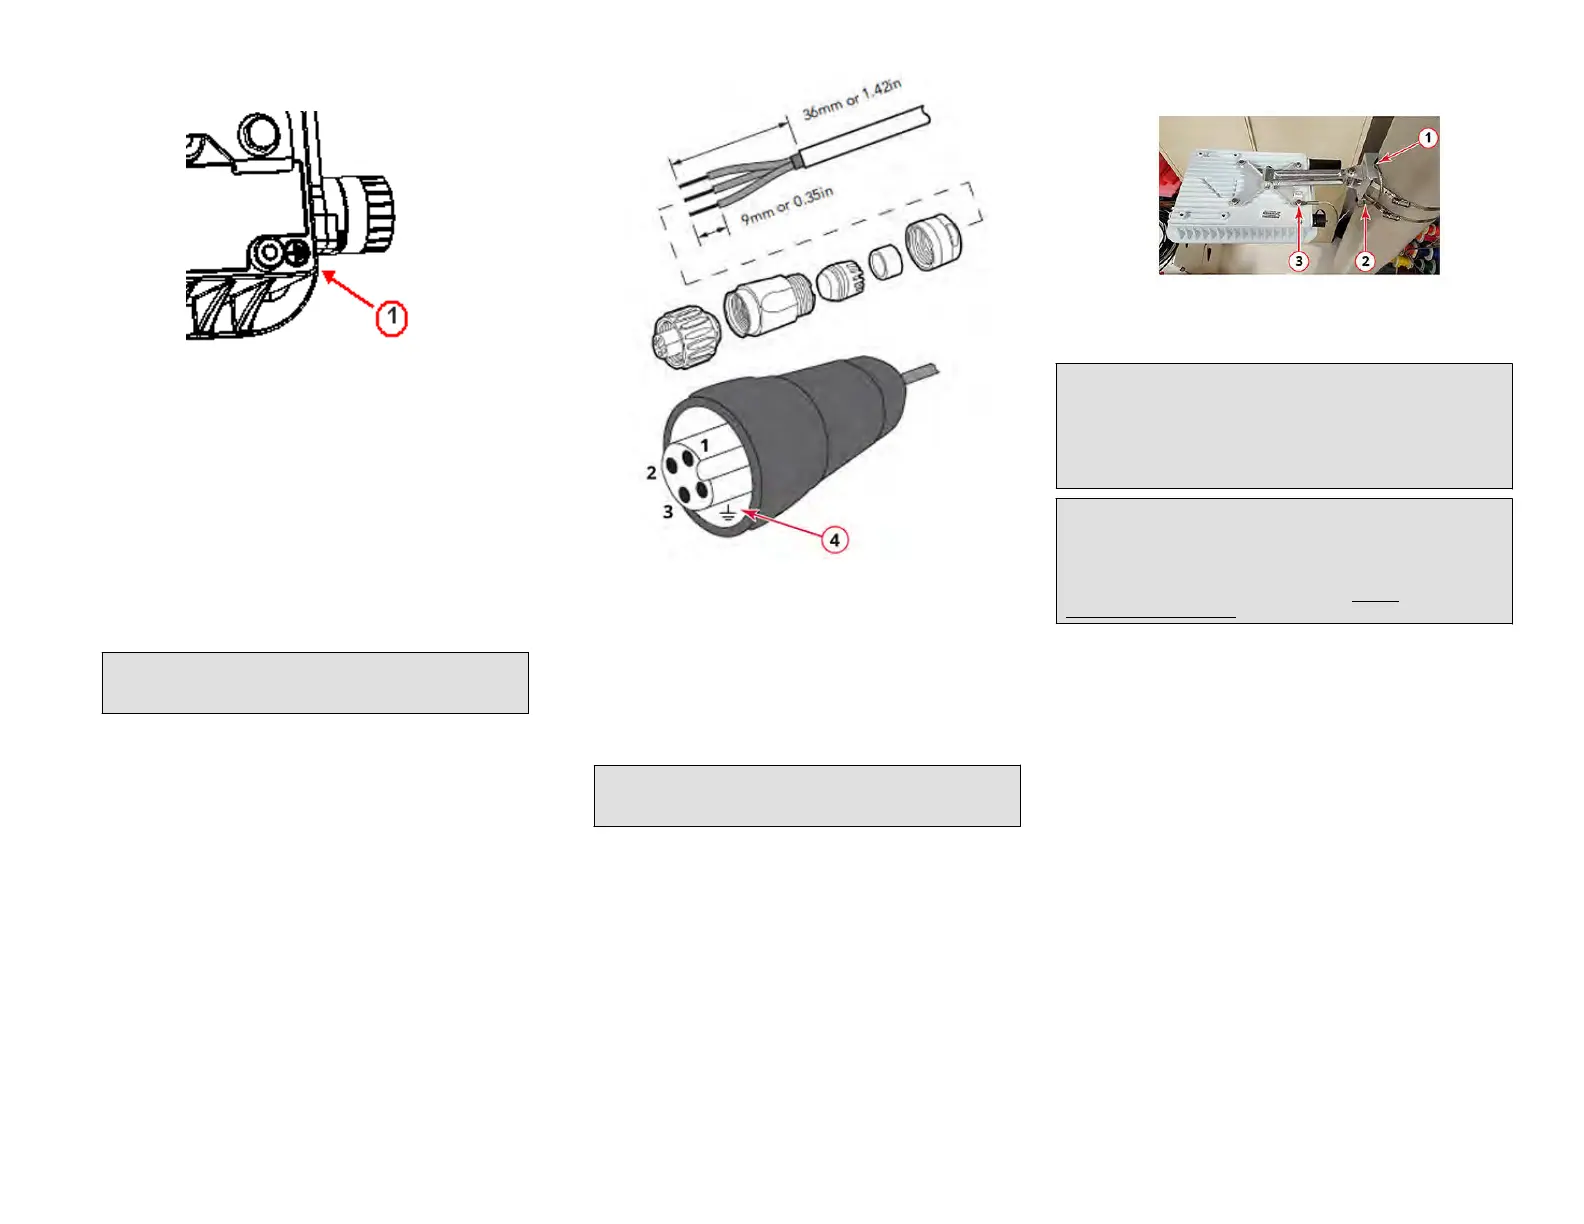
1. Separate the AC cable connector parts by unscrewing the boot from
the cable gland and the cable gland from the connector housing..
2. Feed the end of the AC cable through the boot and cable gland.
3. Strip the AC cable as shown.
4. Insert the stripped part of the conductors into the appropriate
terminals on the connector housing. The conductors are color coded
and must be connected to the appropriate terminals as shown in
gure below.
NOTE: The color coding of wire conductors varies by region. Before
c
ompleng this step, check your local wiring standards for
guidance.
FIGURE 23 Assembling the AC po
wer connector
Wire Stripping (Not Actual Size)
1. (Neutral/Return): White
or Gra
y (US), Blue (EU)
2. (Line/Hot): Black (US),
Brown (EU)
3. (not used)
4. (Earth Ground): Green
(US), Green/Yellow (EU)
5. Using a small screwdriver, ghten the small screws around the
connector housing to x the connector pins into the terminals.
6. Mate the cable gland with the connector housing, and then hand-
ghten.
NOTE: Two di
erent-sized grommets are supplied in the AC
connector assembly kit. Use the grommet that is appropriate to
the diameter of the AC cable that you are using.
7. Mate the boot with the cable gland, and then hand-ght
en to seal.
8. Connect the AC cord connector that you have assembled to the AC
power socket on the AP.
9. Connect the AC cord to an AC power source.
Installing the Security Cable
1. Thread the security cable through the mounng bracket (1 in Figure
12) and through the eye on the cable itself (2 in Figure 12).
2. Aach the safety cable to the AP (3 in Figure 12).
FIGURE 24 Aaching the security cable
Troubleshoong
CAUTION! If required, you can reset the AP to its factory default
sengs by pressing the reset buon located inside the PoE IN port. Use
the p of a pen or a 3mm at blade screwdriver to press the reset
buon. Press and hold the reset buon for 4+ seconds to restore to
factory defaults. DO NOT RESET THE AP TO FACTORY DEFAULT SETTINGS
UNLESS SO INSTRUCTED. (Doing this resets the AP IP address to
192.168.0.1.)
NOTE: Aer a reset, you can access the internal AP web interface using
hps://192.168.0.1. Your device must use any other address from
192.168.0.2 through 192.168.0.254, with subnet mask 255.255.255.0.
The username is super, and the password is sp-admin. Refer to the
Outdoor Access Point User Guide for informaon on conguring and
operang the AP. This document is available at hps://
support.ruckuswireless.com.
For More Informaon
For informaon on how to congure and manage the AP, refer to the
RUCKUS Access Point User Guide, available from hps://
support.ruckuswireless.com.
RUCKUS WIRELESS, Inc. is a wholly owned subsidiary of CommScope, Inc.
©
2020 CommScope, Inc. All rights reserved.
ARRIS, the ARRIS logo, COMMSCOPE, RUCKUS, RUCKUS WIRELESS, the Ruckus
logo, and the Big Dog design are trademarks of CommScope, Inc. and/or its
aliates. Wi-Fi Alliance, Wi-Fi, the Wi-Fi logo, Wi-Fi Cered, the Wi-Fi
CERTIFIED logo, Wi-Fi Protected Access, the Wi-Fi Protected Setup logo, Wi-Fi
Protected Setup, Wi-Fi Mulmedia and WPA2 and WMM are trademarks or
registered trademarks of Wi-Fi Alliance. All other trademarks are the property of
their respecve owners.
Copyright
©
2020 CommScope, Inc. All rights reserved. Page 7 of 7
Published July 2020, Part Number 800-72283-001 Rev B