7
Telehealth medical diagnostic system IDIS2GO
Section 5 Installation
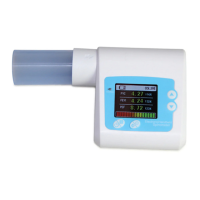
5.1 Front panel appearance
Picture 1: Front panel appearance
5.2 Assembly and disassembly:
1) Turbine assembly: hold the turbine, align the triangular turbine head arrow, carefully insert it at the bottom
side, rotate contraclockwise to lock it;
2) Turbine disassembly: rotate the turbine clockwise and carefully pull it out;
1) Mouthpiece assembly: insert the mouthpiece directly into the turbine port.
5.3 Accessories
1) User manual.
2) USB-cable for charging.
3) Mouthpiece.
4) Power adapter.
5) Nose clip.
Attention
The power adapter must meet the following conditions: output voltage: DC 5V; output current ≥ 500mA, the
power adapter must meet the requirements of EN60601 standards and have the CE mark.
Section 6 User manual
6.1 Working with the device
6.1.1 Power on/off
1) After installation, press and hold the Power button to turn on the device.
2) When the device is switched on, press and hold the power button to turn it off.
6.1.2 Examination
1) The device is in the selection interface after turning on, as shown in the Picture 2, press “up” or “down”
to select “No”, then press the “confirm” button to enter the【Examination】interface as shown in the
Picture 3. (Note. If you select “Yes”, the interface【 Personal information】 for editing personal
information will be entered, after leaving we return to the interface 【Examination】).
2) In the interface 【Examination】, inhale the maximum volume of air, fasten the lips around the
mouthpiece and exhale all the air as strongly as possible in the minimum period of time, wait a few
seconds, the device will open the interface【Main parameters】as shown in the Picture 4.