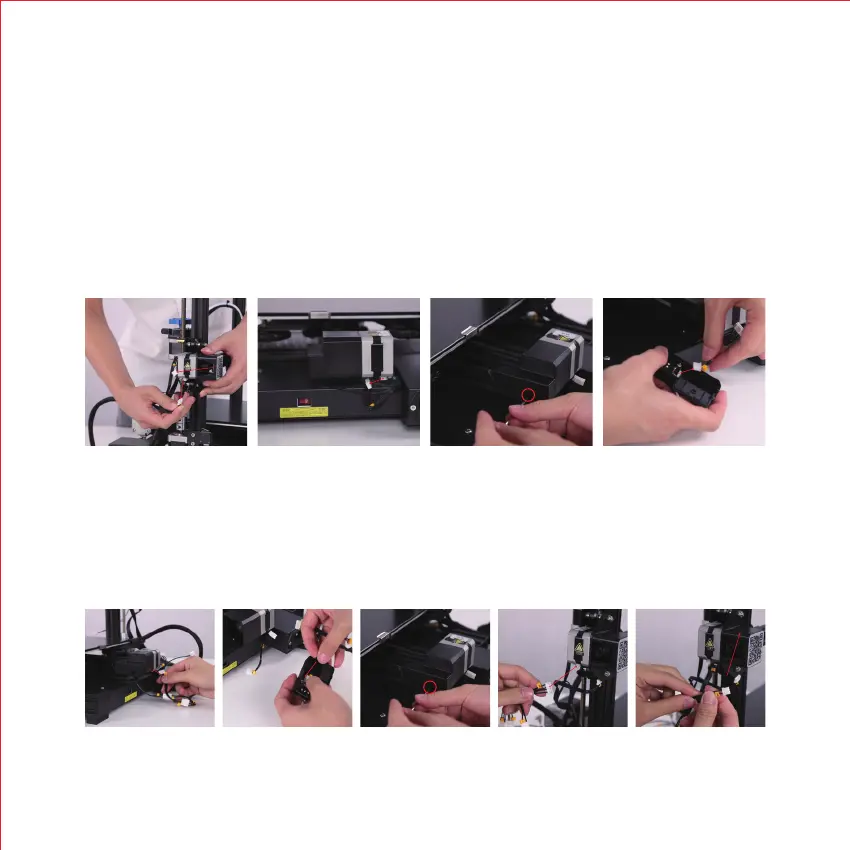
1. 从打印机上拔出 X 轴电机线、Y 轴电机线、X 轴限位开关线、Y 轴限位开关线 (Ender-3 v2、Ender-3 v2 neo、Ender-3 max
neo 需要先拆卸 Y 轴限位开关保护罩,再进行接线 );
1. Pull out the X-axis motor cable, Y-axis motor cable, X-axis limit switch cable, and Y-axis limit switch cable
from the printer(Ender-3 v2, Ender-3 v2 neo, Ender-3 max neo need to remove the Y-axis limit switch protective
cover before wiring).
2. 连接控制盒与打印机,注意排线上的 X、Y 标识;Z 对应激光模组线;
2. Connect the control box to the printer and pay attention to the “X” and “Y” labels on the cable. The “Z”
corresponds to the laser module cable.
以 Ender-3 V2 为例:
Take Ender-3 V2 as an example:
组装说明 Assemble directions
插入Y轴电机线
Insert the Y-axis motor cable
拔出X轴电机线、X轴限位开关线
Pull out the X-axis motor cable and the
X-axis limit switch cable
拔出Y轴电机线
Pull out the Y-axis motor cable
拆卸Y轴限位开关保护罩
Remove the Y-axis limit switch
protective cover
拔出Y轴限位开关线
Pull out the Y-axis limit switch cable
插入Y轴限位开关线
Insert the Y-axis limit switch cable
安装Y轴限位开关保护罩
Install the Y-axis limit switch
protective cover
插入X轴电机线
Insert the X-axis motor cable
插入X轴限位开关线
Insert the X-axis limit switch cable