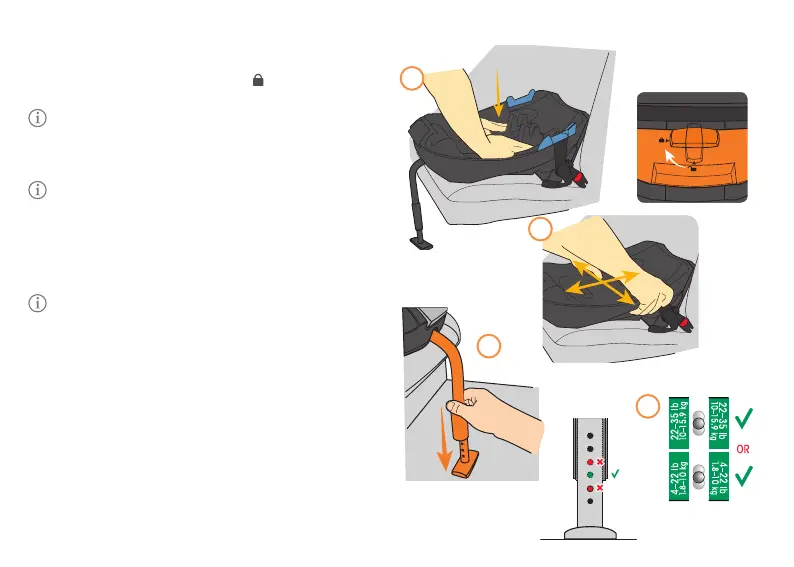
8. Press the Belt Tensioning Plate down with both
hands, where indicated, until it locks into place. The
orange Locking Lever will rotate to the
CLOSE
position automatically when the Plate is locked.
If Belt Tensioning Plate does not lock, try loosening the LATCH strap
slightly.
9. Grab the Base at the Belt Guides and pull from side to side
and front to back to make sure it is installed correctly. The base
should not move more than 1 inch (2.5 cm) in any direction.
If the Base moves too much, open the Belt Tensioning Plate, tension
the LATCH Strap a little more and try again. After this, if the Base still
moves too much, you may need to try a different vehicle seat location
or installation method, or both.
10. Squeeze the Adjustment Handle on the Load Leg
and extend it until the Foot makes rm contact with
vehicle oor. Lock Leg into place using the rst hole
that will rmly lock it against the vehicle oor.
It may be necessary to lift up slightly on the Base to allow the Foot to
lock into the hole. See page 28.
11. Check that the Recline Angle remained in the appropriate
range for the child's weight. If not, remove Base,
adjust recline angle and reinstall. See page 29.
Automatic
DO NOT turn
31
Use the FIRST hole
that will lock the Load
Leg Foot rmly against
vehicle oor
8
9
10
11
INSTALLING THE BASE USING LATCH