13
Installing the D-Link
®
Media
Server Software
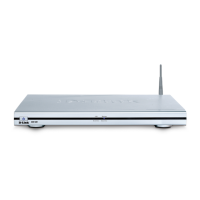
To share audio, video, and photo files from your computer, it is necessary to
install the D-Link
®
Media Server software on the PC that contains the files you
want to share. The D-Link
®
Media Server software allows you to point to the
folders on your PC’s hard drive that contain the audio, video, and photo files
you want to share. The D-Link
®
Media Server software then streams the
information to your DSM-320 via your wired/wireless network connection.
Currently the DSM-320 only connects to one Media Server at a time. If more
than one PC contains files you want to share, you can select one of the following
options:
1. Copy all of the files to one computer designated to run the D-Link
®
Media
Server Software.
2. Map network drives from the computer with the D-Link
®
Media Server
software to additional computers that contain files you want to share. This
method also allows you to share files from computers that cannot run the
D-Link
®
Media Server software such as Macintosh systems. The computer
running the D-Link
®
Media Server software must always be on when
streaming content from any computer.
3. Install the D-Link
®
Media Server software on each computer. You can only
connect to one server at a time. To connect to another server, you must go
into the setup and change the Default Server.
To install the D-Link
®
Media Server software, follow the steps on the following
pages.
Note: If you have a version of the D-Link
®
Media Server already installed on your
system, please uninstall the software and restart your system before installing a
newer version of the software.