BRC1E53 Installer reference guide
4P419250-1
–
2015.10
16
Field settings
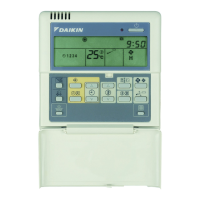
6-6 Press the Menu/Enter button. The
conrmation screen is displayed.
6-7 Select Yes and press the Menu/
Enter button. The settings are
saved and the Field settings
screen returns.
6-6
6-7
NoYes
Field Settings
Save the settings?
SettingReturn
<Field Settings>
Press the Menu/Enter
button.
6-8 When multiple settings need to be
changed, repeat "6-2" to "6-7".
6-9 After all changes are completed,
press the Cancel button twice.
6-10 The backlight goes out and
"Checking the connection. Please
stand by" is displayed during
initialization. After the initialization,
the Basic screen returns.
● When an optional accessory is installed on the indoor unit, the settings of the indoor unit may
be changed. See the manual of the optional accessory.
● For the details on the eld settings of the indoor unit, see the installation manual attached to
the indoor unit.
● The outdoor unit eld settings can only be congured on the outdoor PCB. Refer to the
installation manual attached to the outdoor unit.
● Though the conguration is performed for the whole group, set the Mode No. in parenthesis
when performing an individual conguration per indoor unit or when checking after the
conguration is nished.
● The SECOND CODE NO. at factory shipment depends on the indoor unit model. Default
values can be found in the respective Service Manual of the respective units.
For the following settings, the value is the same for all indoor units.
- Thermostat sensor used for the "Auto" operation mode and the Setback function (room
temperature on detailed display):"02".
- Setback function: "04"
- External input B1: "02"
- External input B2: "02"
- Airow direction range (except roundow cassette): "02"
- Thermostat sensor in remote controller (Sky Air only): "02"
- Rotation overlap time: "03"
● Functions which are unavailable for the connected indoor unit(s) are not displayed.
NOTE