IO-DPV www.daikincomfort.com 7
Installaon
1. Press the ON/OFF/ENERGY SAVING buon to power on the
venlator. Press the CONFIGURE buon once and the
controller will display F and Temp Unit on the right hand side
of the screen.
2. Press the UP or DOWN buon to toggle the temperature
display between Fahrenheit (F) or Celsius (C).
3. Press the CONFIGURE buon again to set the Upper Limit
Temperature. When air entering the home exceeds the
Upper Limit Temperature value entered into the controller, the
venlator will stop running and will enter Sampling Mode.
The words Upper Limit and Temperature will be displayed on
the right hand side of the screen.Use the UP and DOWN buons
to adjust this temperature seng.
4. Press the CONFIGURE buon again to set the Upper Limit
Humidity level. When air entering the home exceeds the Upper
Limit Humidity value entered into the controller, the venla-
tor will stop running
and will enter Sampling Mode. The words
Upper Limit and Humidity will be displayed on the right hand
side of the screen. Use the UP and DOWN buons to adjust this
humidity seng.
5. Press the CONFIGURE buon again to set the Lower Limit
Temperature. When air entering the home falls below the
Lower Limit Temperature value entered into the controller, the
venlator will stop running and will enter Sampling Mode.
The words Lower Limit and Temperature will be displayed on the
right hand side of the screen. Use the UP and DOWN buons to
adjust this temperature seng.
6. Press the CONFIGURE buon again to set the Lower Limit
Humidity. When air entering the home falls below the Lower Limit
Humidity value entered into the controller, the venlator will stop
running and will enter Sampling Mode. The words Lower Limit and
Humidity will be displayed on the right hand side of the screen.
Use the UP and DOWN buons to adjust this humidity seng.
NOTE: Seng this value to 0 will override the set humidity level.
This may be necessary in regions with very low ambient humidity.
7. Press the CONFIGURE buon once more to return the display to
the main screen. The word ON will be displayed in the top le
corner of the screen. At this point, the congured sengs have
been stored.
2. When the venlator is on, the screen will display the current
temperature and relave humidity of the incoming outdoor
intake air as well as the venlator’s operang mode (Energy
Savings mode or not). Addional icons and informaon that may
be displayed on the screen include:
− Venlator icon appears when the venlator is on.
− HI° F appears if the intake temperature is above 150° F (66° C)
− Lo° F appears if the intake temperature is below 15° F (9° C)
− Lo% appears if the intake humidity is below 10%.
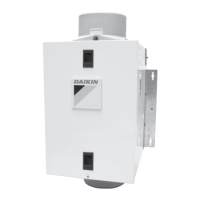
Oponal Heater Accessory Unit
An oponal heater unit, model DQ-P-70-AH-H, is designed for climates
where the outdoor air entering the venlator can fall below 54° F (12°C).
To install the
heater unit, follow the instrucons provided
with that unit. Once installed and power is supplied to the
heater unit, the venlator controller LCD screen will now also
display a thermometer icon. When the temperature of the
intake air is between 39°F and 54° F (4 and 12° C), the heater
unit will operate on Stage 1 heang and the number 1 will be
displayed on the venlator LCD screen; when the temperature
is between 33° F and 39°F (1 and 4° C), the heater unit will
operate on Stage 2 heang and the numbers 1 2 will be
displayed on the screen.
Oponal Motorized Damper
An oponal Motorized Damper Kit, model DQ-P-MDV (sold
separately) can be installed with the venlator. When aached and
wired to the venlator, the Motorized Damper will open when the
venlator is operang and will close when the venlator is turned
o. For installaon specics, refer to the instrucons included with
the DQ-P-MDV Motorized Damper Kit.
Factory Reset
To restore the venlator controller to factory default sengs,
make sure the unit is in the OFF seng. Push and hold both the
UP and DOWN buons for approximately 5 seconds unl the word
OFF on the display ashes once to conrm that the sengs have
been restored.
Maintenance
CAUTION!
Make sure power is switched o at the electrical service panel
before servicing the unit.
1. Cleaning the Fan Assembly: Wipe all parts with a dry cloth
or gently vacuum the fan. NEVER IMMERSE ELECTRICAL
PARTS IN WATER.
2. Inline Air Filter: The air lter in this venlator should be
checked every month and replaced at least once every
3 months or more frequently if the airow restricon
becomes too great. To remove the spent lter, reverse
the instrucons outlined in the Installing or Changing the
Air Filter secon earlier in this manual.
NOTE: If you noce a large amount of insects and debris in
the air lter, this could be a sign that the Air Intake Hood
might be compromised and need repair or replacing.
Service Parts
1. Replacement MERV 16 Air Filter Part # DQ-P-F-16
2. Replacement MERV 13 Air Filter Part # DQ-P-F-13
i
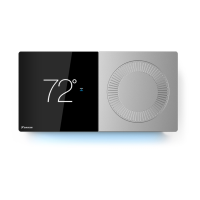
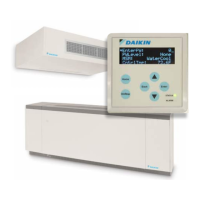
Using the Controller
1.
NOTE: To enter the Energy Savings mode, press the
ON/OFF/ENERGY SAVINGS buon unl the words Energy
Savings appear on the le side of the display. Energy Savings
mode enables the sengs that were selected in the Conguring
the Controller secon earlier in this manual.
Sampling Mode
When the venlator is in Energy Savings Mode and either of
the incoming air temperature or humidity is outside the limits
programmed in the controller, the unit will enter “Sampling Mode”.
In Sampling Mode, the fan will shut down for 15 minutes followed by
a 5-minute run period. The venlator will connue this 15 minutes
o/5 minutes on cycle unl the intake air condions are within the
temperature and humidity limits programmed into the controller.
The controller will also enter Sampling Mode if the intake air drops
below 33°F (1°C). It will cycle 5 minutes on / 15 minutes o unl
the temperature rises about 34˚F (2˚C).
Energy Savings Mode
 Loading...