EasyManua.ls Logo

Daikin ONE - User Manual

Daikin ONE
8 pages
Print Icon
To Next Page IconTo Next Page
Loading...
IO-DPV www.daikincomfort.com 08/20
DAIKIN ONE POWERED VENTILATOR
INSTALLATION &
OPERATION MANUAL
MODEL
DQ-P-16-100
* Complete warranty details available from your local dealer/contractor or
at www.daikincomfort.com.
Only personnel that have been trained to install, adjust, service
or repair (hereinafter, “service”) the equipment specied in this
manual should service the equipment. Daikin will not be
responsible for any injury or property damage arising from
improper service or service procedures. If you service this unit,
you assume responsibility for any injury or property damage
which may result. In addition, in jurisdictions that require one or
more licenses to service the equipment specied in this manual,
only licensed personnel should service the equipment.
Improper installation, adjustment, servicing or repair of the
equipment specied in this manual, or attempting to install,
adjust, service or repair the equipment specied in this manual
without proper training may result in product damage, property
damage, personal injury or death.
WARNING
WARNING
PROP 65 WARNING
FOR CALIFORNIA CONSUMERS
Cancer and Reproductive Harm -
www.P65Warnings.ca.gov
0104M00517-A
Question and Answer IconNeed help?

Do you have a question about the Daikin ONE and is the answer not in the manual?

Summary

Installation

Accessories and General Steps

Lists optional accessories and outlines general installation considerations.

Mounting and Ducting

Covers secure mounting of the unit and connecting ductwork for optimal airflow.

Electrical and Flowrate Setup

Details wiring the unit and setting the desired ventilation flowrate.

Filter and Controller Setup

Guides on installing the air filter and configuring controller settings.

Controller Operation and Options

Explains ventilator operation, modes, optional units, and factory reset.

Maintenance

Fan Assembly Cleaning

Steps for cleaning internal fan components.

Air Filter Maintenance

Guidance on checking and replacing the inline air filter.

Service Parts Information

Lists part numbers for replacement filters.

Troubleshooting Guide

Fan Not Operating

Addresses issues where the fan fails to turn on.

Slow Airflow Issues

Solutions for reduced air movement from the ventilator.

Loud Operation Issues

Remedies for excessive noise during ventilator operation.

Overview

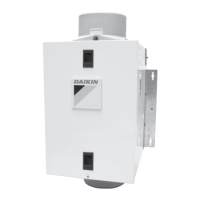
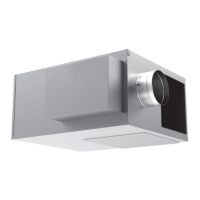
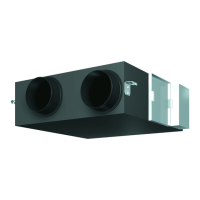
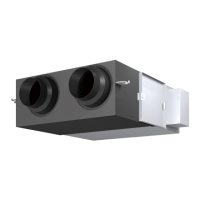
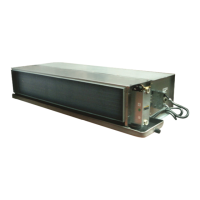
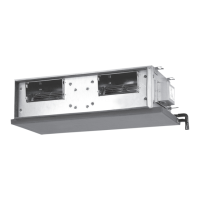
The Daikin One Powered Ventilator is a cost-effective mechanical ventilation solution designed to manage humidity and temperature within a home. It provides a practical method for supplying constant outdoor air into a residence, helping to meet ASHRAE ventilation guidelines.

Function Description

The ventilator's primary function is to introduce fresh outdoor air into the home. It can be configured to deliver between 40 CFM and 100 CFM of outdoor air in 10 CFM increments. The unit is equipped with a controller that monitors the temperature and humidity of the incoming air. This controller allows for the setting of upper and lower limits for both temperature and humidity, enabling an "Energy Saving Mode." In this mode, the ventilator will stop running if the incoming air conditions (temperature or humidity) fall outside the programmed limits, entering a "Sampling Mode." During Sampling Mode, the fan will shut down for 15 minutes, followed by a 5-minute run period, continuing this cycle until intake air conditions are within the set limits. The controller also initiates Sampling Mode if the intake air drops below 33°F (1°C), cycling 5 minutes on / 15 minutes off until the temperature rises to about 34°F (2°C).

Usage Features

The ventilator is designed for residential installations and requires proper installation by trained personnel to ensure optimal performance and safety. It can be surface-mounted to a wall or ceiling, or mounted to joists or hanging rods. For best air and sound performance, it is recommended to keep ducting length and the number of elbows to a minimum, use large radius elbows, and insulated rigid duct where possible. The unit includes a small wiring compartment for making electrical connections to the main power supply.

The controller, mounted inside the ventilator, features an LCD screen that displays the current temperature and relative humidity of the incoming outdoor air, as well as the ventilator's operating mode. Users can toggle the temperature display between Fahrenheit (F) or Celsius (C). The controller allows users to set:

  • Upper Limit Temperature: If incoming air exceeds this, the ventilator stops and enters Sampling Mode.
  • Upper Limit Humidity: If incoming air exceeds this, the ventilator stops and enters Sampling Mode.
  • Lower Limit Temperature: If incoming air falls below this, the ventilator stops and enters Sampling Mode.
  • Lower Limit Humidity: If incoming air falls below this, the ventilator stops and enters Sampling Mode. Setting the lower humidity limit to 0 will override the set humidity level, which may be necessary in regions with very low ambient humidity.

The "Energy Saving Mode" helps prevent large swings in temperature or humidity caused by extreme outdoor conditions, reducing unnecessary energy consumption and improving occupant comfort.

Optional accessories can enhance the ventilator's capabilities:

  • Heater (70 CFM & Higher): For climates where outdoor air falls below 54°F (12°C). When installed, the controller displays a thermometer icon. The heater operates on Stage 1 (39°F to 54°F) or Stage 2 (33°F to 39°F) heating.
  • Motorized Damper Kit: When attached and wired, the damper opens when the ventilator operates and closes when it's off.
  • Air Intake Hood: A suitable air intake hood with an insect screen is required to protect the air intake.

Maintenance Features

Regular maintenance is crucial for the ventilator's efficient operation.

  • Inline Air Filter: The ventilator includes a high-efficiency MERV 16 inline media air filter to remove airborne particulates. This filter should be checked monthly and replaced at least every 3 months, or more frequently if airflow restriction becomes too great. If the MERV 16 filter is too restrictive, a MERV 13 filter (DQ-P-F-13) can be used as a replacement. Homeowners can perform this basic maintenance task.
  • Insect Screen: The unit is equipped with a wire mesh insect screen inside the control compartment, just inside the intake port. This screen should be checked for insects and debris. If a large amount is found, it may indicate an issue with the Air Intake Hood.
  • Fan Assembly: The fan assembly should be wiped with a dry cloth or gently vacuumed. It is important never to immerse electrical parts in water.
  • Ducting: Obstructions in the ducting, such as bird or insect nests in the Air Intake Hood, should be checked and cleared.
  • Factory Reset: The controller can be restored to factory default settings by pushing and holding both the UP and DOWN buttons for approximately 5 seconds while the unit is in the OFF setting.

Only trained personnel should service the equipment, especially for installation, adjustment, or repair, to avoid injury, property damage, or product damage. All installation work and electrical wiring must comply with applicable codes and standards.
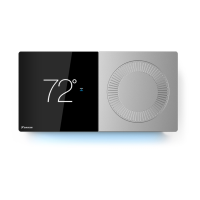
Daikin ONE Specifications

General IconGeneral
TypeSmart thermostat
CompatibilityDaikin HVAC systems
ConnectivityWi-Fi
ControlVoice control
DisplayTouchscreen
FeaturesSmart scheduling, Geofencing, Energy reports, Air quality monitoring

Related product manuals