MAN-PTS-GB, Revision 9, BSC, 15-FEB-2017 24/46
5.3.1 SAFETY CHECK
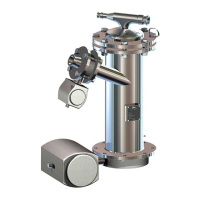
1) Verify that all parts of the PTS installation are correctly earthed (cf. chap. 6.2, pt. 8);
2) Make sure that the PTS filter is correctly installed (cf. chap. 6.2, pt. 4);
3) Check that all screws and connections are tight;
4) Check the pneumatic connection:
• Open the compressed air supply to the control panel;
• Check that all the valves are closed;
• Check the valve sequence during a dry test according to the description of chapter 3
or the enclosed logic diagram (make sure that the vacuum and pressure sources are out
of operation);
5) Modify the pneumatic connections if required;
6) Adjust the pressure regulator for the discharge at a value between 0.8 to 1.2 bar;
7) Verify that the vacuum pump is in operation;
8) Control the tightness of the installation:
• Install a manometer in the vacuum line before the PTS;
• Check that the butterfly valves V1, V2 (product) and V4 (cleaning gas) are closed and
open valve V3 (vacuum);
• Record the internal pressure of the system as soon as the manometer reading is constant;
• In case the required vacuum is not reached (end vacuum of vacuum pump), look for
any connections which are not tight. Correctly install or exchange the gasket which
leaks.
5.3.2 ADJUSTMENTS
Risk of damage to components!
In order to prevent operating problems and a possible clogging of the installation, it
is imperative to adjust the operating parameters at the first commissioning.
Check that the pressure supply to the valves is not below 5 bar and not higher than
7 bar. The ideal pressure is of 6 bar.
1) Adjust the suction time. Slowly increase the time in order to reach the optimum value;
A suction time, which is too long, can have a negative effect on the suction
capacity. Adjust the timer at a value inferior to 20 s.
2) Adjust the emptying time. Adjust the discharge timer at a high value and decrease the time
slowly;