MAN-PTS-GB, Revision 9, BSC, 15-FEB-2017 31/46
7.3 DRYING
The complete unit must be dried prior to start a new conveying. Some parts should also be
exchanged.
The selector switch must be reset to “transfer”.
The following drying sequences should be strictly followed:
1) Operate the PTS during a predetermined period of time being able to empty the line from
the remaining liquid (approx. 15 min);
2) Replace the membrane (for synthetic membrane only);
3) Operate the system for a few cycles without aspiration of powder to empty the suction hose
and to rinse the PTS body of traces of liquid.
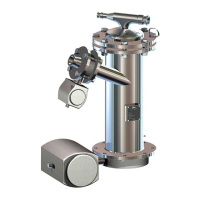
7.4 FILTER CHANGE
The PTS filter cloth can be replaced easily and at a low cost. We recommend changing the
membrane at the end of a campaign or when changing products. One should do the same
when the transfer capacity decreases or when large quantities of fine particles pass the
membrane.
Risk of accident!
A risk of dust creation and injury exists when opening the cover if the PTS chamber is
still under pressure. Before opening the cover, ensure that the system is shut down
and the chamber is not under vacuum or pressure (vent the unit beforehand).
The membrane doesn’t need to be replaced at each cleaning when the cleaning
liquid is compatible with the membrane (see membrane data sheet in the technical
documentation) and when the membrane is dried carefully.
1) Shut down the PTS System and vacuum pump;
2) Close the compressed air supply to the control panel;
3) Open the cover of the PTS System (screws or fast couplings depending on the PTS model);
4) Remove the cover;
5) Remove the upper flat gasket from the cover;
6) Remove the filter support (filter cover and body);
7) Remove the lower flat gasket which was below the filter support;
8) Clean the filter with compressed air or inert gas to remove traces of the product;
9) Remove the upper part of the filter support;