Do you have a question about the DECKED MG3 and is the answer not in the manual?
Lists all necessary tools for installing the DECKED system in a Chevy Colorado/GMC Canyon.
Key advice and warnings to follow before and during the DECKED installation process.
Instructions on marking the center line on the truck bed for accurate DECKED system placement.
Detailed steps for cleaning the bed and applying the provided shims at specific locations.
Process for securing factory tie-downs using provided brackets, bolts, and nuts.
Instructions for attaching the center and cabside vertical supports using bolts.
Loosely attaching the driver and passenger side studs to the cabside vertical support.
Securing deck panels to studs by aligning and tightening bolts, then removing panels.
Attaching the driver and passenger side stud brackets to the respective studs.
Lifting the assembled structure into the truck bed and aligning it with centerline marks.
Positioning and fastening the C-channels to the ammo cans and studs on both sides.
Placing and securing the driver and passenger side deck panels onto the assembled structure.
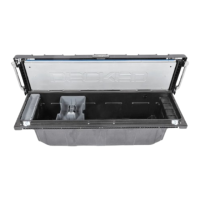
Assembling and loosely installing the J-hook components into the ammo cans.
Attaching brackets and wheels to the drawer components using specific bolts and hex wrench.
Installing tailgate wheels onto drawer axles and correctly positioning weatherstrips on drawer edges.
Installing the torsion brace and aligning/tightening the bottle opener onto the center vert.
Attaching the ruler to the deck panels, including drilling and securing with screws.
Securing the driver and passenger side ammo can lids and installing optional drawer locks.
| Brand | DECKED |
|---|---|
| Model | MG3 |
| Category | Automobile Accessories |
| Language | English |