Replacing the Power-Supply
Fan
WARNING: Before working inside your computer, read the safety
information that shipped with your computer and follow the steps in
Before Working Inside Your Computer. After working inside your
computer, follow the instructions in After Working Inside Your
Computer. For more safety best practices, see the Regulatory
Compliance home page at dell.com/regulatory_compliance.
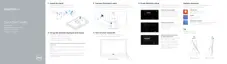
Procedure
1 Connect the power-supply fan cable to the power-supply unit.
2 Align the screw holes on the power-supply fan with the screw holes on
the display-panel base.
3 Replace the screws that secure the power-supply fan to the display-
panel base.
4 Align the screw holes on the power-supply fan bracket with the screw
holes on the display-panel base.
5 Replace the screw that secures the power-supply fan bracket to the
display-panel base.
Post-requisites
1 Replace the I/O bracket.
2 Replace the power-supply diagnostic board.
3 Replace the VESA-mount bracket.
4 Replace the system-board shield.
5 Replace the back cover.
6 Replace the stand assembly.
72
 Loading...