13
Fig. 18
Fig. 19
Fig. 20
Fig. 21
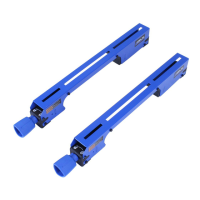
5. Assemble longer section of rear guide rail (P) Fig. 18,
and shorter section of guide rail (R) to extension wings
and saw table at points (A) with 16MM long hex head
screw (S), two flat washers (T), lockwasher (V), and hex
nut (W); and at points (B) and (C) Fig. 18, with 16MM
long hex head screws (S), lockwasher (V) and one flat
washer (T). NOTE: DO NOT COMPLETELY TIGHTEN
HARDWARE AT THIS TIME. Hardware at point (C)
Fig. 18, will be positioned between guide rails (P) and (R)
as shown in Fig. 19.
6. Using a square (X) Fig. 19, set a depth of 7/16″ on
the scale, place the square (X) at the center and on top
of the saw table. Working toward the two ends of the
rear guide rail, make certain the rear guide rail is parallel
to the saw table, at 7/16" from the top of the table.
Tighten all mounting hardware as height adjustment is
made to the rear guide rails.
ASSEMBLING RIP FENCE
1. Insert handle (A) Fig. 20 into threaded hole (B) in rip
fence (C).
2. Insert flat head screwdriver into rip fence handle (A)
Fig. 21 and tighten screw (not shown).
Tighten hex nut (D) Fig. 21 against fence body.
P
A
B
C
B
A
R
S
T
V
W
X
P
C
R
C
B
A
A
D