Do you have a question about the Delta 36-540 and is the answer not in the manual?
Read the instruction manual before operating and use caution.
Always wear safety glasses and appropriate clothing to prevent injury.
Keep the work area clean, well-lit, and operate the tool with common sense.
Check for damaged parts, ensure guards are in place, and disconnect power before servicing.
Ensure correct assembly and always use the blade guard, splitter, and anti-kickback fingers.
Hold work firmly, avoid free-hand cuts, and maintain safe hand positions away from the blade.
Take measures to prevent kickbacks, feed material correctly, and stop the saw safely.
Instructions for carefully removing the saw and identifying all packed components.
Step-by-step guide to attach the blade height adjustment handwheel.
Information on electrical connections, voltage, frequency, and motor details.
Critical guidelines for proper grounding to prevent electric shock.
Recommendations for selecting appropriate extension cords based on gauge and length.
How to operate the power switch and lock it in the 'OFF' position.
Explanation of the motor overload relay and how to reset it.
Detailed instructions for performing cross-cutting operations using the miter gage.
Information regarding the terms and conditions of the two-year limited warranty.
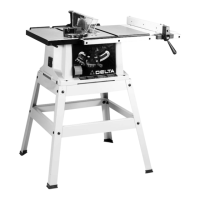
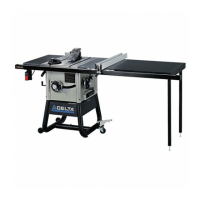
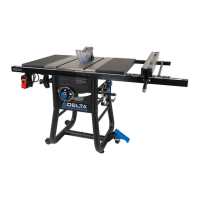
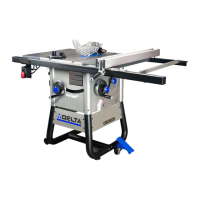
This document is an instruction manual for a 10" Motorized Bench Saw, specifically models 36-540 and 36-545, which come with a stand. The manual provides comprehensive information on the assembly, operation, and maintenance of the saw, emphasizing safety procedures throughout.
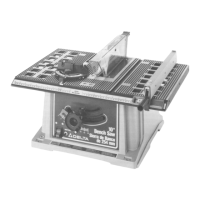
The primary function of this device is woodworking, enabling users to perform various sawing operations such as ripping and cross-cutting. It is designed for both general woodworking tasks and more specialized applications, provided they align with the machine's intended use. The saw is equipped with a 10-inch diameter blade, suitable for cutting a variety of wood products.
The saw incorporates several features to enhance usability and precision. It includes a blade raising and lowering handwheel, allowing the user to adjust the blade's height for different cutting depths. The handwheel is assembled to a shaft, ensuring a secure fit. For blade tilting, a blade tilting lock handle and a separate handwheel are provided, enabling the user to set the blade at desired angles, including positive stops at 90 and 45 degrees for rapid and accurate positioning. These stops are adjustable, allowing for fine-tuning to ensure precise cuts.
The rip fence is a crucial component for ripping operations, designed to be moved along the table and locked into position. It features a pointer to indicate the distance from the saw blade, which can be adjusted for accuracy. The manual stresses the importance of aligning the rip fence parallel to the miter gage slot to prevent kickback during ripping. The clamping action of the fence is also adjustable, allowing users to increase or decrease its grip on the table.
For cross-cutting, the saw utilizes a miter gage, which is supplied with a T-slot miter gage bar. This bar fits into either of the two T-slotted grooves on the table top, preventing the miter gage from falling when extended. The miter gage's body can be moved to various angles by loosening a lock knob, facilitating angled cross-cuts. For added safety and convenience during cross-cutting, an auxiliary wood-facing can be attached to the miter gage.
The saw is designed with an on/off switch located on the front of the cabinet. This switch can be locked in the "OFF" position by removing a toggle, preventing unauthorized use. An overload protection feature is also integrated, with a reset button that activates if the motor shuts off due to overloading or low voltage. This ensures the motor's longevity and prevents potential damage or fire hazards.
Maintenance is a key aspect highlighted in the manual to ensure the saw's safe and optimal performance. Regular checks of the blade guard and splitter assembly are crucial, as they must be properly aligned to the saw blade to prevent kickback. The assembly instructions detail how to fasten and adjust these components, emphasizing the need for a 1/8" gap between the splitter's bottom edge and the table surface.
Blade changing is a routine maintenance task, for which the manual provides clear instructions. It specifies the use of 10" diameter saw blades rated for 4600 RPM or higher with 5/8" arbor holes. Users are guided to raise the blade to its maximum height, remove the table insert, and use provided wrenches to remove and replace the blade and flanges. The importance of proper blade orientation (teeth pointing down at the front of the table) is also noted.
The manual also covers the adjustment of the blade parallel to the miter gage slots. This adjustment, initially set at the factory, should be rechecked periodically to ensure accurate cuts and prevent kickback. The process involves using a combination square to check the blade's alignment at both the front and rear of the saw table and loosening screws to make necessary adjustments.
Proper grounding of the tool is emphasized for electrical safety, requiring a 3-wire extension cord with a 3-prong grounding type plug. The manual provides a chart for selecting the correct gage of extension cord based on ampere rating and cord length. It also details the importance of providing a sawdust fall-through and removal hole in the supporting surface to prevent sawdust build-up around the motor, which could lead to fire hazards or motor damage.
For ripping narrow stock (less than 4 inches wide), the use of a push stick is recommended, and the manual includes a pattern for constructing one from scrap material. Additionally, the manual describes how to construct a featherboard to keep work in contact with the fence and table, helping to prevent kickbacks during non "thru-sawing" operations. These accessories are crucial for safe and effective operation, especially when the guard and splitter assembly must be removed. The manual advises always replacing the guard and splitter assembly once non "thru-sawing" operations are completed.
| No-Load Speed | 5000 rpm |
|---|---|
| Blade Diameter | 10 inches |
| Max Rip Capacity | 30 inches |
| Arbor Size | 5/8 inches |
| Maximum Rip Capacity Right | 30 inches |
| Maximum Rip Capacity Left | 12 in |
| Maximum Depth of Cut at 45 Degrees | 2-1/4 in |
| Max Cut Depth at 45° | 2-1/4 in |
| Table Size | 20 x 26 inches |