Do you have a question about the Delta 36-6020 and is the answer not in the manual?
Defines DANGER, WARNING, and CAUTION signal words used in the manual for hazard identification.
Covers essential safety practices for power tool operation, including usage, maintenance, and work area protocols.
Defines essential terms like kickback, push stick, and through-cut for clear understanding of saw operations.
Critical safety practices for table saw use, including guards, push sticks, and avoiding kickback.
Explains the function and installation of the blade guard, anti-kickback pawls, and riving knife.
Provides instructions and recommendations for creating a safe push stick for table saw operations.
Detailed instructions and conditions to prevent dangerous kickback incidents during operation.
Specifies electrical requirements for the 15-amp motor and proper circuit setup for safe operation.
Details recommended gauge, length, and type of extension cords for safe operation.
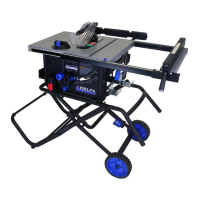
Lists all components included in the saw package and their corresponding labels for verification.
Details the specific screws, bolts, and tools included in the hardware bags for assembly.
Step-by-step instructions for assembling the saw's support stand and its primary components.
Instructions for attaching the wheels and installing the pedal assembly to the stand.
Details attaching the pedal assembly to the folding assembly and support rods.
Guides on connecting the assembled stand to the main saw unit.
Instructions for installing the saw blade, arbor, flanges, and essential safety guards.
Steps for inserting the throat plate and installing the anti-kickback pawls and blade guard.
Instructions for installing out-feed supports, the rip fence, and on-board accessory storage.
A critical checklist to ensure the saw is safe and ready for operation before starting.
Guidance on preventing kickback and actions to take if it occurs during operation.
Instructions for safely operating the power switch and locking it out when not in use.
Steps for folding the stand and safely moving the table saw.
Critical warnings and precautions to follow before and during all cutting operations.
Illustrates common cut types like cross cut, rip cut, and mitered crosscut for visual reference.
Detailed steps for performing standard rip cuts using the rip fence and proper technique.
Instructions for making rip cuts at an angle using the saw's bevel feature.
Step-by-step guide for performing crosscuts using the miter gauge and table slots.
Instructions for performing crosscuts at an angle using the bevel feature.
Guidance on setting up and performing miter cuts with the miter gauge at various angles.
Instructions for combining bevel and miter angles for complex compound cuts.
Advice on using work supports for safely cutting large or oversized panels.
Explains non-through cuts like grooves, rabbets, and dados, including essential safety measures.
Specific instructions and safety precautions for making dado cuts using dado blades.
Details the importance and proper use of push sticks to maintain hand safety during cuts.
Instructions for adding an auxiliary facing to the miter gauge for increased support and accuracy.
Step-by-step guide for constructing a custom push block for enhanced workpiece control.
Explains how to use featherboards to control workpieces and prevent kickback.
Instructions for using a clamped block as a cut-off gauge for repetitive, precise cuts.
Discusses the use and creation of specialized jigs for controlling specific workpiece shapes or cuts.
Steps to ensure the throat plate is flush with the saw table surface for smooth operation.
Guides on aligning the blade perpendicular to the table surface for accurate cuts.
Procedures for setting the 0° and 45° positive stops for accurate bevel cuts.
Instructions for setting the blade height for both through and non-through cuts.
Steps to unlock, adjust, and lock the blade bevel angle accurately.
Guidance on using the miter gauge for crosscuts and beveled crosscuts.
Instructions for extending the out-feed support for improved stability with long workpieces.
Steps to lower the riving knife for non-through cuts or dado operations.
Instructions for extending the right-hand table extension for increased work surface area.
Locating the riving knife for non-through and through cuts.
Adjusting the riving knife for parallel alignment with the blade for precise cutting.
Guidelines for cleaning air passages and plastic parts, plus lubrication and maintenance reminders.
Common causes and checks for the machine failing to start, including power connections.
Information on where to find and purchase Delta-recommended accessories for enhanced functionality.
Details the terms and conditions of the manufacturer's limited warranty for the product.
Guidance on ordering identical replacement parts and accessing service information.
Information on how to obtain free replacements for illegible or missing warning labels.
| Type | Table Saw |
|---|---|
| Blade Diameter | 10 inches |
| Motor Power | 15 Amps |
| Arbor Size | 5/8 inches |
| Voltage | 120V |
| Max. RPM | 5000 RPM |
| Max Cut Depth at 90 degrees | 3-1/8 inches |
| Max Cut Depth at 45 degrees | 2-1/4 inches |
| Max Cut Depth at 90° | 3-1/8 inches |
| Max Cut Depth at 45° | 2-1/4 inches |
| No-Load Speed | 5000 RPM |