Rev. F, December 2020
Page 19 Pro-Wedge VM-20 Operator’s Manual
8.4
Starting a Weld
To start a weld, you must first make sure that the material to be welded is set at the proper
overlap. The optimum overlap is 5-6 inches (12.7-15.2 cm) for field welds. For
recommendation on in-house fabrication overlap settings, please contact the manufacturer.
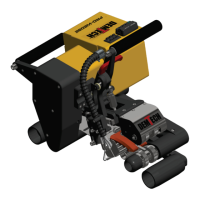
Start the loading process with the nip lever in the “up” or disengaged position, the heating wedge
in the “forward” or disengaged position (Figure 7.5), and the motor on with the nip rollers
turning.
First, peel back the top sheet to expose the bottom sheet. Load bottom sheet of the
material into welder, between both lower contour rollers and the bottom of heating
wedge, then between the two nip rollers.
Second, insert the top sheet into the welder, between the upper contour roller(s) and the
top of the heating wedge, and then between the nip rollers. You may need to roll the
welder forward and backward a little for both sheets to settle into the welder.
Third, pull out on the wedge lock handle and slide wedge toward nip rollers until the
lock pin slides off the end on the slide rail. Make sure wedge is completely engaged
before continuing.
Fourth, engage nip rollers by pushing the nip pressure lever down until it “clicks” and is
locked in position. At this time the welder should be moving and welding on its own. If
the nip rollers are spinning on the material and burning a hole, quickly disengage nip
rollers, roll the welder down the seam a few more inches, past the overheated area, and
engage again.
8.5
Ending a Weld
Just as the welder is about to run out of the end of the seam, disengage nip rollers, slide
welder out of the seam, and then disengage wedge. At this time it is a good idea to tip the
Pro-Wedge up onto the front handle, raising the back of the unit, to prevent a hole being
melted in the material from heat radiating from the wedge.
8.6
Shut-Down
To shut down the Pro-Wedge, simply turn main power switch to the “off” position or
unplug unit. After 5-10 minutes, place unit in shipping/storage case provided with
welder.